
In our malware laboratory sandbox, we emulate a large number of samples each day. These emulations provide a lot of useful information, such as IoCs (Indicators of Compromise), that we use to protect our customers. Usually, we expect to see a small number of emulations that return an incomplete report.
Recently, we noted an increase in the number of samples (from a known family) with incomplete reports.
During our investigation, we discovered that some of the emulated samples caused the system to crash, displaying an error screen also known as BSOD (Blue Screen of Death). Unfortunately, we didn’t have a tool to automatically find these types of samples.
Possible reasons for a system crash include:
- An unsuccessful attempt to exploit system vulnerability.
- The malware loads a kernel mode driver which crashes the system (by design or due to a bug).
- Termination of a crucial system process.
This is the simplified architecture of a typical sandbox for malware analysis:
The analyzed malware is usually executed inside a virtual machine with an emulated or monitored Internet connection. The entire analytical process is controlled from the sandbox engine through an agent that also runs inside the virtual machine. The agent receives commands from the engine, executes the submitted sample, and collects behavior data from the sample and other affected processes. Auxiliary modules can be used to capture screenshots, emulate human interaction, etc. The sandbox engine collects the analysis results, parses captured network data from the sniffer, and stores them in the database. The results are displayed to the user via web interface.
One limitation of the sandbox agent is that it works in the user mode (Ring 3) in the target system and communicates with the sandbox engine until the target OS is healthy. If something goes wrong, the sandbox engine just stops receiving data from the target machine. There are a number of reasons why the sandbox engine doesn’t receive data: the system was rebooted, the virtual machine was switched off or experienced network connectivity issues, and also system crash.
The auxiliary screenshot module lets us see the changes on the desktop of a guest machine during the analysis process. In the case of BSOD, however, this is useless because it is displayed in the kernel mode (Ring 0), and the user mode application stops working after that point. The Windows kernel is still functional even when a critical system error has occurred (for example, it is needed to make a crash dump). The kernel mode part of the Windows network stack is also functional until the network devices are shut down.
Using this feature, we can create a “post-mortem” communication channel with the sandbox controller. This can be done with the NDIS protocol driver [1] in which we produce UDP frames and send them directly to the NIC driver using NDIS binding.
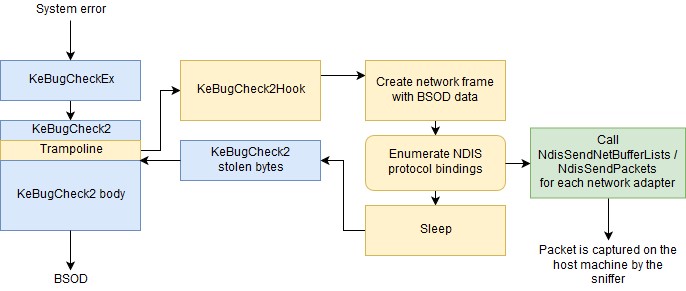
The function that actually handles the system crash and displays BSOD is KeBugCheck2. A stop code and four parameters are passed into this function. The value of each parameter depends on the reason for the crash. After displaying the well-known blue screen, the KeBugCheck2 function calls “bugcheck callbacks” registered by device drivers [2], which allow the drivers to stop their devices. It then calls “reason callbacks”, which allow the drivers to append their data to the crash dump.
To make sure that the network device, which is needed to send the “post-mortem” message, was not stopped, it is better to hook the KeBugCheck2 function and do our job before passing control. This guarantees that our handler will be able to send the message before the “bugcheck callbacks” are invoked.[3] The KeBugCheck2 function is not exported by the kernel, but there is an exported and documented KeBugCheckEx[4] wrapper that can be used to acquire the address of KeBugCheck2:
As a template to create our driver, we can use the Windows Driver Kit example Ndisprot [5]. There are two versions of the driver: for NDIS5 and NDIS6.x[6]. If we want to run our driver on Windows XP and Windows 7 and higher, we should support both NDIS5 and NDIS6. Ndisprot is a generic connectionless protocol driver that can bind to specified network adapters, set up filters (like switching an adapter to promiscuous mode), receive raw network frames and pass them to the user mode client, and get raw packet data from user mode and send it using the selected adapter. We don’t need the functionality related to receiving data. We also don’t need to communicate with user mode, because our driver should act only on system crash.
In the most common case, there can be several network adapters in the target virtual machine. We enumerate all network adapters that have binding to our NDIS protocol and send a broadcast frame (with the broadcast target MAC address) containing the captured BSOD data.
This is how the driver works:
If we don’t want to invent our own protocol for passing data from the driver to the sandbox engine, we can use the DNS protocol. Usually, automated malware analysis systems already have functionality for parsing DNS requests.
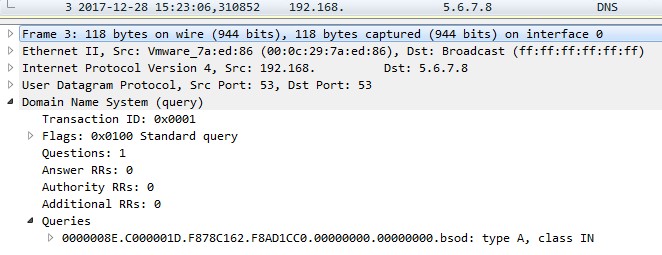
We send the BSOD data (a bug-check code and parameters) packed in a DNS A query with this format:
Let’s compile and run the driver in the virtual machine and start a sample that crashes the system. When the BSOD is shown, we can see the corresponding packet in the Wireshark:
After the driver runs within the guest OS of our sandbox, the sniffer catches the packet each time the BSOD occurs.
Next, we need to implement a small processing module, which parses the captured network data and updates the analysis report if the “post-mortem” message is found.
The last thing we need to do is to update the web interface to display the new data.
This solution doesn’t depend on a particular sandbox and can be integrated in almost any malware emulation laboratory environment, thus making it a useful addition to your emulation toolbox.
Links:
[1] https://docs.microsoft.com/en-us/windows-hardware/drivers/network/ndis-protocol-drivers
[2] https://docs.microsoft.com/en-us/windows-hardware/drivers/ddi/content/wdm/nf-wdm-keregisterbugcheckcallback
[4] https://docs.microsoft.com/en-us/windows-hardware/drivers/ddi/content/wdm/nf-wdm-kebugcheckex
[5] https://github.com/Microsoft/Windows-driver-samples/tree/master/network/ndis/ndisprot/
[6] https://docs.microsoft.com/en-us/windows-hardware/drivers/network/overview-of-ndis-versions


