Research by: Eyal Itkin
TL;DR
Cameras. We take them to every important life event, we bring them on our vacations, and we store them in a protective case to keep them safe during transit. Cameras are more than just a tool or toy; we entrust them with our very memories, and so they are very important to us.
In this blog, we recount how we at Check Point Research went on a journey to test if hackers could hit us in this exact sweet spot. We asked: Could hackers take over our cameras, the guardians of our precious moments, and infect them with ransomware?
And the answer is: Yes.
Background: DSLR cameras aren’t your grandparents’ cameras, those enormous antique film contraptions you might find up in the attic. Today’s cameras are embedded digital devices that connect to our computers using USB, and the newest models even support WiFi. While USB and WiFi are used to import our pictures from the camera to our mobile phone or PC, they also expose our camera to its surrounding environment.
Our research shows how an attacker in close proximity (WiFi), or an attacker who already hijacked our PC (USB), can also propagate to and infect our beloved cameras with malware. Imagine how would you respond if attackers inject ransomware into both your computer and the camera, causing them to hold all of your pictures hostage unless you pay ransom.
Below is a Video Demonstration of this attack:
Technical Details
Picture Transfer Protocol (PTP)
Modern DSLR cameras no longer use film to capture and later reproduce images. Instead, the International Imaging Industry Association devised a standardised protocol to transfer digital images from your camera to your computer. This protocol is called the Picture Transfer Protocol (PTP). Initially focused on image transfer, this protocol now contains dozens of different commands that support anything from taking a live picture to upgrading the camera’s firmware.
Although most users connect their camera to their PC using a USB cable, newer camera models now support WiFi. This means that what was once a PTP/USB protocol that was accessible only to the USB connected devices, is now also PTP/IP that is accessible to every WiFi-enabled device in close proximity.
In a previous talk named “Paparazzi over IP” (HITB 2013), Daniel Mende (ERNW) demonstrated all of the different network attacks that are possible for each network protocol that Canon’s EOS cameras supported at the time. At the end of his talk, Daniel discussed the PTP/IP network protocol, showing that an attacker could communicate with the camera by sniffing a specific GUID from the network, a GUID that was generated when the target’s computer got paired with the camera. As the PTP protocol offers a variety of commands, and is not authenticated or encrypted in any way, he demonstrated how he (mis)used the protocol’s functionality for spying over a victim.
In our research we aim to advance beyond the point of accessing and using the protocol’s functionality. Simulating attackers, we want to find implementation vulnerabilities in the protocol, hoping to leverage them in order to take over the camera. Such a Remote Code Execution (RCE) scenario will allow attackers to do whatever they want with the camera, and infecting it with Ransomware is only one of many options.
From an attacker’s perspective, the PTP layer looks like a great target:
- PTP is an unauthenticated protocol that supports dozens of different complex commands.
- Vulnerability in PTP can be equally exploited over USB and over WiFi.
- The WiFi support makes our cameras more accessible to nearby attackers.
In this blog, we focus on the PTP as our attack vector, describing two potential avenues for attackers:
- USB – For an attacker that took over your PC, and now wants to propagate into your camera.
- WiFi – An attacker can place a rogue WiFi access point at a tourist attraction, to infect your camera.
In both cases, the attackers are going after your camera. If they’re successful, the chances are you’ll have to pay ransom to free up your beloved camera and picture files.
Introducing our target
We chose to focus on Canon’s EOS 80D DSLR camera for multiple reasons, including:
- Canon is the largest DSLR maker, controlling more than 50% of the market.
- The EOS 80D supports both USB and WiFi.
- Canon has an extensive “modding” community, called Magic Lantern.
Magic Lantern (ML) is an open-source free software add-on that adds new features to the Canon EOS cameras. As a result, the ML community already studied parts of the firmware, and documented some of its APIs.
Attackers are profit-maximisers, they strive to get the maximum impact (profit) with minimal effort (cost). In this case, research on Canon cameras will have the highest impact for users, and will be the easiest to start, thanks to the existing documentation created by the ML community.
Obtaining the firmware
This is often the trickiest part of every embedded research. The first step is to check if there is a publicly available firmware update file in the vendor’s website. As expected, we found it after a short Google search. After downloading the file and extracting the archive, we had an unpleasant surprise. The file appears to be encrypted / compressed, as can be seen in Figure 1.
Figure 1 – Byte histogram of the firmware update file.
The even byte distribution hints that the firmware is encrypted or compressed, and that whatever algorithm was used was probably a good one. Skimming through the file, we failed to find any useful pattern that could potentially be a hint of the existence of the assembly code for a bootloader. In many cases, the bootloader is uncompressed, and it contains the instructions needed for the decryption / decompression of the file.
Trying several decompression tools, such as Binwalk or 7Zip, produced no results, meaning that this is a proprietary compression scheme, or even an encryption. Encrypted firmware files are quite rare, due to the added costs of key management implications for the vendor.
Feeling stuck, we went back to Google, and checked what the internet has to say about this .FIR file. Here we can see the major benefit of studying a device with an extensive modding community, as ML also had to work around this limitation. And indeed, in their wiki, we found this page that describes the “update protection” of the firmware update files, as deployed in multiple versions over the years. Unfortunately for us, this confirms our initial guess: the firmware is AES encrypted.
Being open-source, we hoped that ML would somehow publish this encryption key, allowing us to decrypt the firmware on our own. Unfortunately, that turned out not to be the case. Not only does ML intentionally keep the encryption key secret, we couldn’t even find the key anywhere in the internet. Yet another dead end.
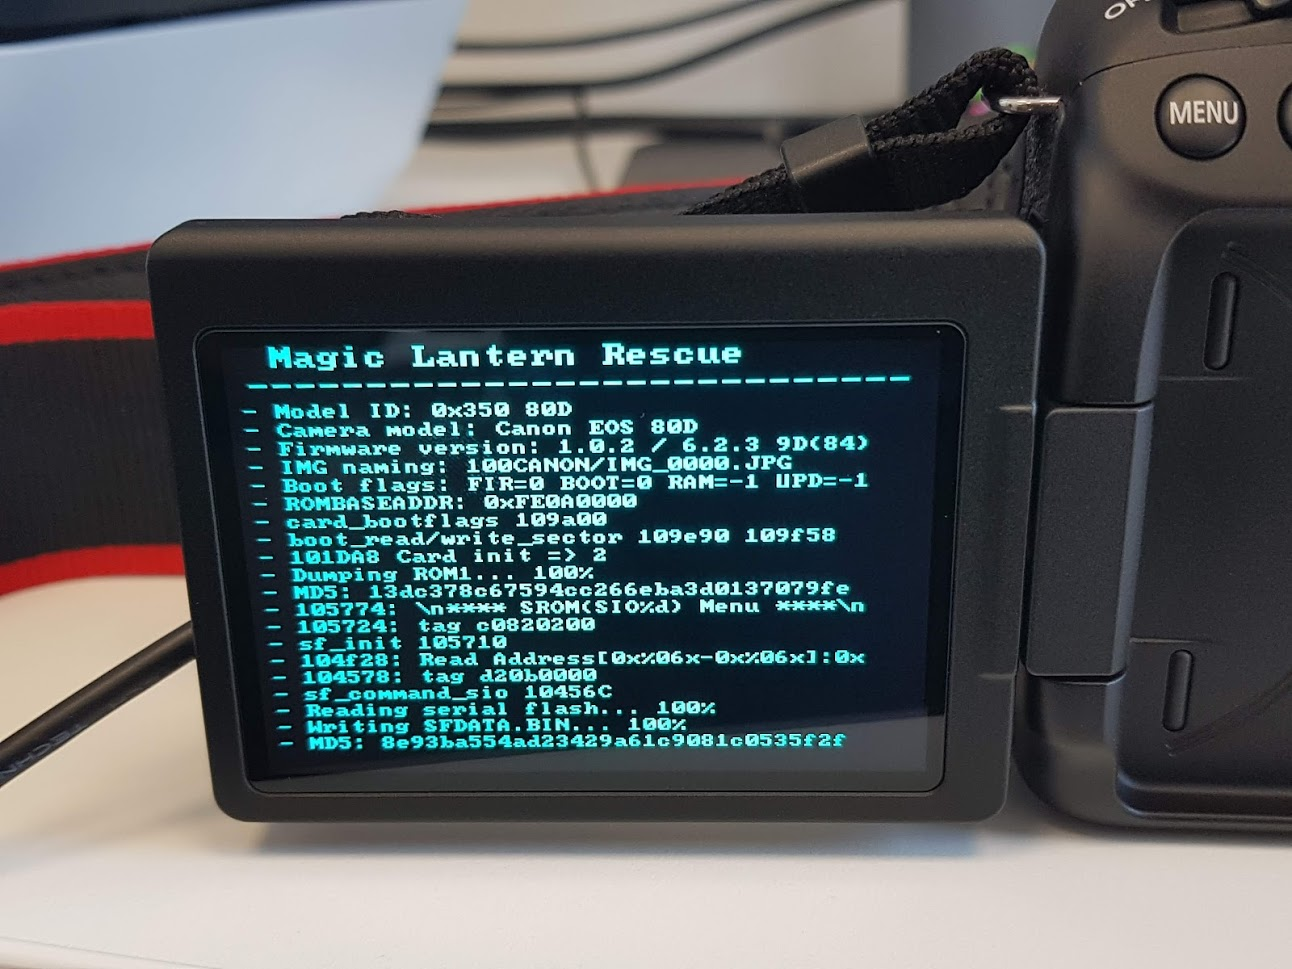
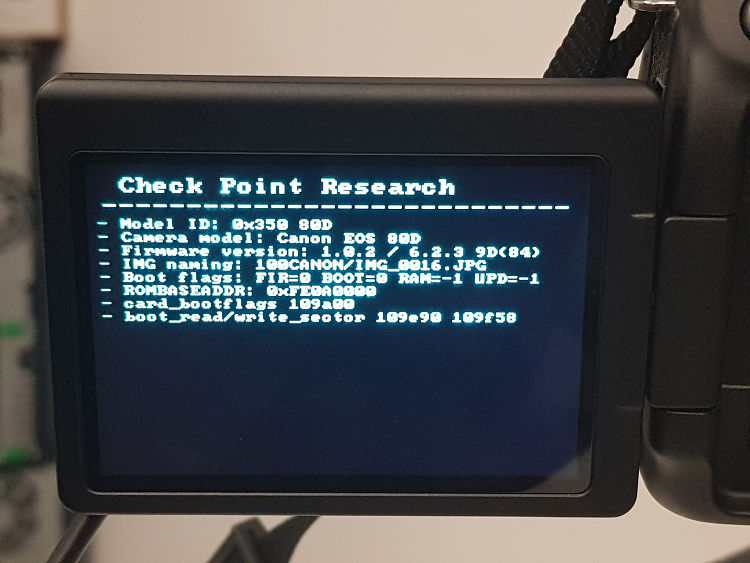
The next thing to check was if ML ported their software to our camera model, on the chance it contains debugging functionality that will help us dump the firmware. Although such a port has yet to be released, while reading through their forums and Wiki, we did find a breakthrough. ML developed something called Portable ROM Dumper. This is a custom firmware update file that once loaded, dumps the memory of the camera into the SD Card. Figure 2 shows a picture of the camera during a ROM dump.
Figure 2 – Image taken during a ROM Dump of the EOS 80D.
Using the instructions supplied in the forum, we successfully dumped the camera’s firmware and loaded it into our disassembler (IDA Pro). Now we can finally start looking for vulnerabilities in the camera.
Reversing the PTP layer
Finding the PTP layer was quite easy, due to the combination of two useful resources:
- The PTP layer is command-based, and every command has a unique numeric opcode.
- The firmware contains many indicative strings, which eases the task of reverse-engineering it.
Figure 3 – PTP-related string from the firmware.
Traversing back from the PTP OpenSession handler, we found the main function that registers all of the PTP handlers according to their opcodes. A quick check assured us that the strings in the firmware match the documentation we found online.
When looking on the registration function, we realized that the PTP layer is a promising attack surface. The function registers 148 different handlers, pointing to the fact that the vendor supports many proprietary commands. With almost 150 different commands implemented, the odds of finding a critical vulnerability in one of them is very high.
PTP Handler API
Each PTP command handler implements the same code API. The API makes use of the ptp_context object, an object that is partially documented thanks to ML. Figure 4 shows an example use case of the ptp_context:
Figure 4 – Decompiled PTP handler, using the ptp_context object.
As we can see, the context contains function pointers that are used for:
- Querying about the size of the incoming message.
- Receiving the incoming message.
- Sending back the response after handling the message.
It turns out that most of the commands are relatively simple. They receive only a few numeric arguments, as the protocol supports up to 5 such arguments for every command. After scanning all of the supported commands, the list of 148 commands was quickly narrowed down to 38 commands that receive an input buffer. From an attacker’s viewpoint, we have full control of this input buffer, and therefore, we can start looking for vulnerabilities in this much smaller set of commands.
Luckily for us, the parsing code for each command uses plain C code and is quite straight-forward to analyze. Soon enough, we found our first vulnerability.
CVE-2019-5994 – Buffer Overflow in SendObjectInfo – 0x100C
PTP Command Name: SendObjectInfo
PTP Command Opcode: 0x100c
Internally, the protocol refers to supported files and images as “Objects”, and in this command the user updates the metadata of a given object. The handler contains a Buffer Overflow vulnerability when parsing what was supposed to be the Unicode filename of the object. Figure 5 shows a simplified code version of the vulnerable piece of code:
Figure 5 – Vulnerable code snippet from the SendObjectInfo handler.
This is a Buffer Overflow inside a main global context. Without reversing the different fields in this context, the only direct implication we have is the Free-Where primitive that is located right after our copy. Our copy can modify the pKeywordsStringUnicode field into an arbitrary value, and later trigger a call to free it.
This looks like a good way to start our research, but we continued looking for a vulnerability that is easier to exploit.
CVE-2019-5998 – Buffer Overflow in NotifyBtStatus – 0x91F9
PTP Command Name: NotifyBtStatus
PTP Command Opcode: 0x91F9
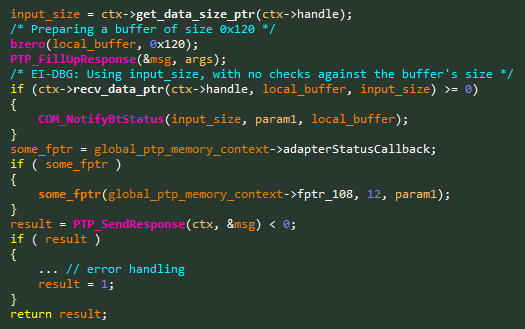
Even though our camera model doesn’t support Bluetooth, some Bluetooth-related commands were apparently left behind, and are still accessible to attackers. In this case, we found a classic Stack-Based Buffer Overflow, as can be seen in Figure 6.
Figure 6 – Vulnerable code snippet from the NotifyBtStatus handler.
Exploiting this vulnerability will be easy, making it our prime target for exploitation. We would usually stop the code audit at this point, but as we are pretty close to the end of the handler’s list, let’s finish going over the rest.
CVE-2019-5999– Buffer Overflow in BLERequest – 0x914C
PTP Command Name: BLERequest
PTP Command Opcode: 0x914C
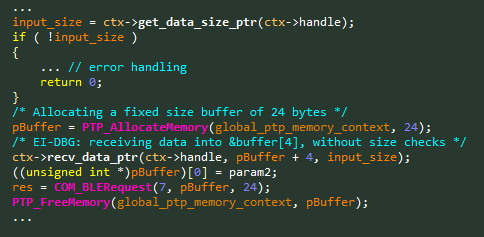
It looks like the Bluetooth commands are more vulnerable than the others, which may suggest a less experienced development team. This time we found a Heap-Based Buffer Overflow, as can be seen in Figure 7.
Figure 7 – Vulnerable code snippet from the BLERequest handler.
We now have 3 similar vulnerabilities:
- Buffer Overflow over a global structure.
- Buffer Overflow over the stack.
- Buffer Overflow over the heap.
As mentioned previously, we will attempt to exploit the Stack-Based vulnerability, which will hopefully be the easiest.
Gaining Code Execution
We started by connecting the camera to our computer using a USB cable. We previously used the USB interface together with Canon’s “EOS Utility” software, and it seems natural to attempt to exploit it first over the USB transport layer. Searching for a PTP Python library, we found ptpy, which didn’t work straight out of the box, but still saved us important time in our setup.
Before writing a code execution exploit, we started with a small Proof-of-Concept (PoC) that will trigger each of the vulnerabilities we found, hopefully ending in the camera crashing. Figure 8 shows how the camera crashes, in what is described by the vendor as “Err 70.”
Figure 8 – Crash screen we received when we tested our exploit PoCs.
Now that we are sure that all of our vulnerabilities indeed work, it’s time to start the real exploit development.
Basic recap of our tools thus far: Our camera has no debugger or ML on it. The camera wasn’t opened yet, meaning we don’t have any hardware-based debugging interface. We don’t know anything about the address space of the firmware, except the code addresses we see in our disassembler. The bottom line is that we are connected to the camera using a USB cable, and we want to blindly exploit a Stack-Based buffer overflow. Let’s get started.
Our plan is to use the Sleep() function as a breakpoint, and test if we can see the device crash after a given number of seconds. This will confirm that we took over the execution flow and triggered the call to Sleep(). This all sounds good on paper, but the camera had other plans. Most of the time, the vulnerable task simply died without triggering a crash, thus causing the camera to hang. Needless to say, we can’t differentiate between a hang, and a sleep and then hang, making our breakpoint strategy quite pointless.
Originally, we wanted a way to know that the execution flow reached our controlled code. We therefore decided to flip our strategy. We found a code address that always triggers an Err 70 when reached. From now on, our breakpoint will be a call to that address. A crash means we hit our breakpoint, and “nothing”, a hang, means we didn’t reach it.
We gradually constructed our exploit until eventually we were able to execute our own assembly snippet – we now have code execution.
Loading Scout
Scout is my goto debugger. It is an instruction-based debugger that I developed during the FAX research, and that proved itself useful in this research as well. However, we usually use the basic TCP loader for Scout, which requires network connectivity. While we can use a file loader that will load Scout from the SD Card, we will later need the same network connectivity for Scout, so we might as well solve this issue now for them both.
After playing with the different settings in the camera, we realized that the WiFi can’t be used while the USB is connected, most likely because they are both meant to be used by the PTP layer, and there is no support for using them both at the same time. So we decided the time had come to move on from the USB to WiFi.
We can’t say that switching to the WiFi interface worked out of the box, but eventually we had a Python script that was able to send the same exploit script, this time over the air. Unfortunately, our script broke. After intensive examination, our best guess is that the camera crashes before we return back from the vulnerable function, effectively blocking the Stack-Based vulnerability. While we have no idea why it crashes, it seems that sending a notification about the Bluetooth status, when connecting over WiFi, simply confuses the camera. Especially when it doesn’t even support Bluetooth.
We went back to the drawing-board. We could try to exploit one of the other two vulnerabilities. However, one of them is also in the Bluetooth module, and it doesn’t look promising. Instead, we went over the list of the PTP command handlers again, and this time looked at each one more thoroughly. To our great relief, we found some more vulnerabilities.
CVE-2019-6000– Buffer Overflow in SendHostInfo – 0x91E4
PTP Command Name: SendHostInfo
PTP Command Opcode: 0x91E4
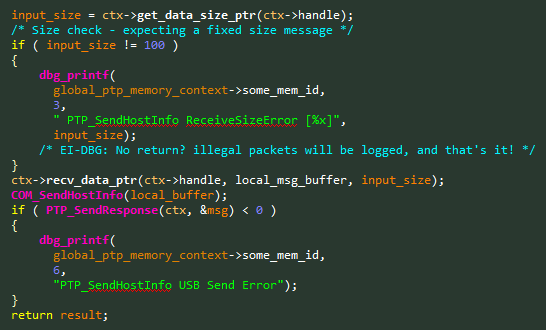
Looking at the vulnerable code, as seen in Figure 9, it was quite obvious why we missed the vulnerability at first glance.
Figure 9 – Vulnerable code snippet from the SendHostInfo handler.
This time the developers remembered to check that the message is the intended fixed size of 100 bytes. However, they forgot something crucial. Illegal packets will only be logged, but not dropped. After a quick check in our WiFi testing environment, we did see a crash. The logging function isn’t an assert, and it won’t stop our Stack-Based buffer overflow 😊
Although this vulnerability is exactly what we were looking for, we once again decided to keep on looking for more, especially as this kind of vulnerability will most likely be found in more than a single command.
CVE-2019-6001– Buffer Overflow in SetAdapterBatteryReport – 0x91FD
PTP Command Name: SendAdapterBatteryReport
PTP Command Opcode: 0x91FD
Not only did we find another vulnerability with the same code pattern, this was the last command in the list, giving us a nice finish. Figure 10 shows a simplified version of the vulnerable PTP handler.
Figure 10 – Vulnerable code snippet from the SendAdapterBatteryReport handler.
In this case, the stack buffer is rather small, so we will continue using the previous vulnerability.
Side Note: When testing this vulnerability in the WiFi setup, we found that it also crashes before the function returns. We were only able to exploit it over the USB connection.
Loading Scout – Second Attempt
Armed with our new vulnerability, we finished our exploit and successfully loaded Scout on the camera. We now have a network debugger, and we can start dumping memory addresses to help us during our reverse engineering process.
But, wait a minute, aren’t we done? Our goal was to show that the camera could be hijacked from both USB and WiFi using the Picture Transfer Protocol. While there were minor differences between the two transport layers, in the end the vulnerability we used worked in both cases, thus proving our point. However, taking over the camera was only the first step in the scenario we presented. Now it’s time to create some ransomware.
Time for some Crypto
Any proper ransomware needs cryptographic functions for encrypting the files that are stored on the device. If you recall, the firmware update process mentioned something about AES encryption. This looks like a good opportunity to finish all of our tasks in one go.
This reverse engineering task went much better that we thought it would; not only did we find the AES functions, we also found the verification and decryption keys for the firmware update process. Because AES is a symmetric cipher, the same keys can also be used for encrypting back a malicious firmware update and then signing it so it will pass the verification checks.
Instead of implementing all of the complicated cryptographic algorithms ourselves, we used Scout. We implemented a new instruction that simulates a firmware update process, and sends back the cryptographic signatures that the algorithm calculated. Using this instruction, we now know what are the correct signatures for each part in the firmware update file, effectively gaining a signing primitive by the camera itself.
Since we only have one camera, this was a tricky part. We want to test our own custom home-made firmware update file, but we don’t want to brick our camera. Luckily for us, in Figure 11 you can see our custom ROM Dumper, created by patching Magic Lantern’s ROM Dumper.
Figure 11 – Image of our customized ROM Dumper, using our header.
CVE-2019-5995 – Silent malicious firmware update:
There is a PTP command for remote firmware update, which requires zero user interaction. This means that even if all of the implementation vulnerabilities are patched, an attacker can still infect the camera using a malicious firmware update file.
Wrapping it up
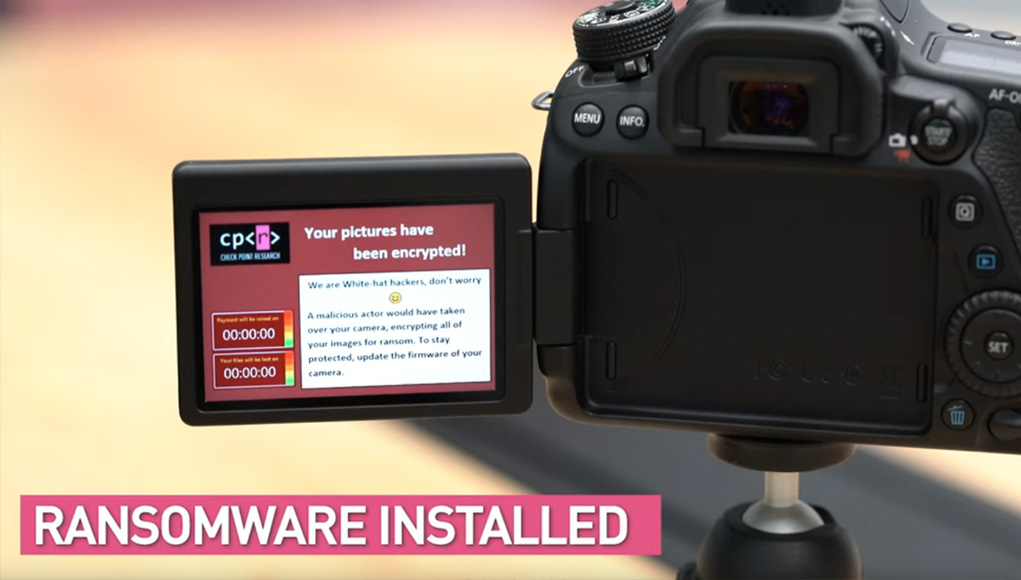
After playing around with the firmware update process, we went back to finish our ransomware. The ransomware uses the same cryptographic functions as the firmware update process, and calls the same AES functions in the firmware. After encrypting all of the files on the SD Card, the ransomware displays the ransom message to the user.
Chaining everything together requires the attacker to first set-up a rogue WiFi Access Point. This can be easily achieved by first sniffing the network and then faking the AP to have the same name as the one the camera automatically attempts to connect. Once the attacker is within the same LAN as the camera, he can initiate the exploit.
Here is a video presentation of our exploit and ransomware.
Disclosure Timeline
- 31 March 2019 – Vulnerabilities were reported to Canon.
- 14 May 2019 – Canon confirmed all of our vulnerabilities.
- From this point onward, both parties worked together to patch the vulnerabilities.
- 08 July 2019 – We verified and approved Canon’s patch.
- 06 August 2019 – Canon published the patch as part of an official security advisory.
Canon’s Security Advisory
Here are the links to the official security advisory that was published by Canon:
- Japanese: https://global.canon/ja/support/security/d-camera.html
- English: https://global.canon/en/support/security/d-camera.html
We strongly recommend everyone to patch their affected cameras.
Conclusion
During our research we found multiple critical vulnerabilities in the Picture Transfer Protocol as implemented by Canon. Although the tested implementation contains many proprietary commands, the protocol is standardized, and is embedded in other cameras. Based on our results, we believe that similar vulnerabilities can be found in the PTP implementations of other vendors as well.
Our research shows that any “smart” device, in our case a DSLR camera, is susceptible to attacks. The combination of price, sensitive contents, and wide-spread consumer audience makes cameras a lucrative target for attackers.
A final note about the firmware encryption. Using Magic Lantern’s ROM Dumper, and later using the functions from the firmware itself, we were able to bypass both the encryption and verification. This is a classic example that obscurity does not equal security, especially when it took only a small amount of time to bypass these cryptographic layers.

