

Packers or crypters are widely used to protect malicious software from detection and static analysis. These auxiliary tools, through the use of compression and encryption algorithms, enable cybercriminals to prepare unique samples of malicious software for each campaign or even per victim, which complicates the work of antivirus software. In the case of certain packers, classifying malicious software without employing dynamic analysis becomes a challenging task.
To analyze a malicious sample and extract its configuration data, such as encryption keys and command and control server addresses, we must first unpack it. We can do this by running the malicious software in a sandbox environment, such as CAPE, followed by extracting the memory dumps. However, this method has some drawbacks. For example, it’s often impossible to run the dumps we obtain for further, deeper analysis, and sandbox emulation itself requires significant time and resources.
In this article, we examine a group of packers based on the Nullsoft Scriptable Install System (NSIS) and describe an approach for creating a tool that lets us obtain unpacked samples automatically.
NSIXloader: NSIS-based crypter
An NSIS package is essentially a self-extracting archive coupled with an installation system that supports a scripting language. It contains compressed files, along with installation instructions written in the NSIS scripting language. To access the contents without running the installation package, we can use an unarchiver tool that recognizes the NSIS format and supports its compression methods, such as 7-Zip.
The advantage for cybercriminals in using NSIS is that it allows them to create samples that, at first glance, are indistinguishable from legitimate installers. As NSIS performs compression on its own, malware developers do not need to implement compression and decompression algorithms. The scripting capabilities of NSIS allow for the transfer of some malicious functionality inside the script, making the analysis more complex.
When we analyzed campaigns involving XLoader, we noticed that packers from the same NSIS-based family are often used to protect the samples. We later discovered that these same packers are employed alongside a wide range of malicious software, including these families:
- AgentTesla
- Remcos
- 404 Keylogger
- Lokibot
- Azorult
- Warzone
- Formbook
- XLoader
Unfortunately, in the analyzed samples, we could not find any text strings that suggested an obvious name for this packer, except for the DLL name “Loader.dll” and a PDB path containing the same name:

Figure 1 – DLL and PDF filename inside the malicious sample.
Therefore, we decided to call it “NSIXloader.”
Packers of this family are very widespread and have been known at least since 2016.
Packed sample structure
Most of the samples we analyzed have a similar file structure inside the archive.

Figure 2 – The contents of the malicious installer package.
In the root directory of the archive, there are two binary files with encrypted data. In the $PLUGINSDIR directory, there is a DLL exporting several functions, one of which must be called to unpack the payload.
NSIS supports a plugin system, which consists of DLL files that are placed by default in the $PLUGINSDIR directory. The malicious DLL is disguised as one of these plugins. NSIS allows for easy invocation of plugin functions using the following syntax:
<DLL_NAME>::<function_name>
The malicious installer utilizes a very simple NSIS script whose task is to unpack the encrypted files, place them into a temporary directory, and then call a function inside the malicious DLL. In the example below, the function called is “HvDeclY”:
InstallDir $TEMP
; …
Function .onGUIInit
    InitPluginsDir
    SetOutPath $INSTDIR
    SetOverwrite off
    File tiejkfis.yp
    File pvynjhnv.oh
    rnthgfcoj::HvDeclY
DLL
The DLL functionality is very simple. The DLL reads the smallest encrypted file (“pvynjhnv.oh” in the example) and the name of the file is hard-coded. It then decrypts the file using the XOR operation with a text key:
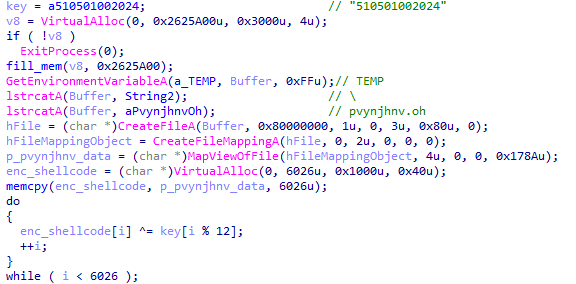
Figure 3 – Shellcode decryption inside the DLL.
After the decryption, it passes execution to the decrypted code:

Figure 4 – Calling the decrypted shellcode.
In some variants, before using the XOR operation, a cyclic shift of each byte of the encrypted text is performed:

Figure 5 – Shellcode decryption in some samples.
Shellcode
The decrypted file contains a position-independent shellcode. Its execution starts with initializing the name of the file containing the encrypted payload and obtaining the addresses of several Windows API functions.

Figure 6 – APIs are resolved by their hashes.
Instead of API function names, the loader stores 4-byte hashes computed using a simple algorithm. To obtain the addresses of the desired functions, the loader parses the header of kernel32.dll and locates the address of the export table. Next, it calculates the hash of each function name and compares it with the hash of the desired function. Afterward, the loader reads and decrypts the payload:
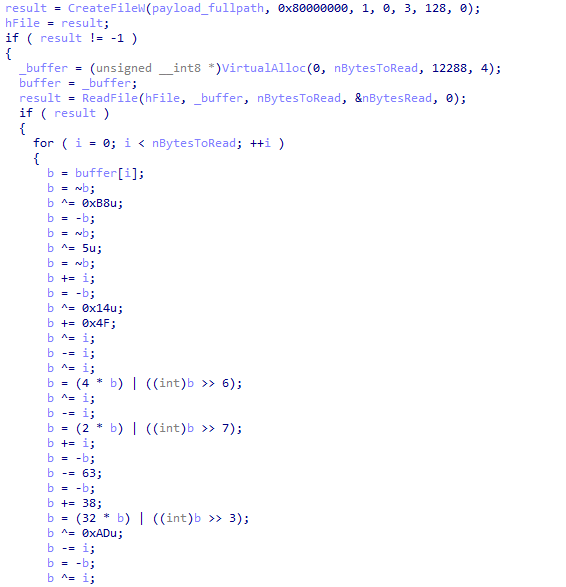
Figure 7 – The payload decryption routine.
Each of the analyzed samples uses a unique sequence of operations. Despite the simplicity of the cipher, to implement an automatic decrypter for the payload, we need to reproduce the unique sequence of commands for each sample.
After applying this algorithm, the loader obtains the decrypted payload.
Approach to automatic payload unpacking
We can use 7-zip in the first step to extract and decompress the files from the NSIS package. The rest of the automation can be done in Python.
After extracting the files, we need to obtain the encryption key from the DLL. In all analyzed samples, the encryption key is represented as a text string consisting of lowercase Latin letters and digits. We can use the following regular expression for searching:
dll_key_re = re.compile(br"([a-z\d]{10,20})\x00")
The key is always located at the beginning of the .data or .rdata section, so it can be extracted in the following way using the malduck library:
from malduck import procmempe

def dll_extract_keys(dll_data):
    p = procmempe(dll_data)
    for section in filter(lambda s: b"data" in s.Name, p.pe.sections):
        data = p.readp(section.PointerToRawData, section.SizeOfRawData)
        for found in dll_key_re.finditer(data):
            yield found.group(1)
Now that we have the key, we can easily decrypt the shellcode. Taking into account that the packer may apply the cyclic shift before the XOR operation, we can check each value of the shift and validate the decrypted shellcode using a regular expression:
def decrypt_loader(data, dll_key):
    for shift in range(8):
        shifted_data = [(b >> shift) | (b << (8 - shift)) & 0xFF for b in data] if shift else data
        dec_data = xor(dll_key, shifted_data)
        if shellcode_validation_re.search(dec_data):
            return dec_data
However, the most challenging task is reconstructing the payload decryption algorithm from the shellcode.
Let’s take a look at the assembly code of this algorithm:
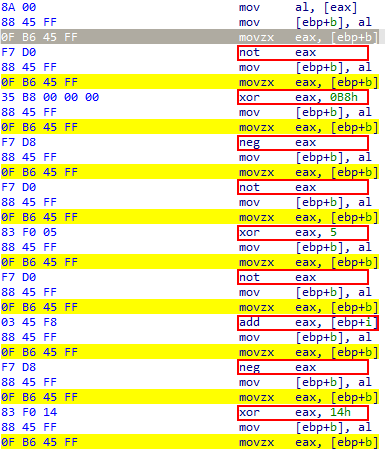
Figure 8 – Specific patterns in the payload decryption routine.
Each operation is followed by updating the current byte in the buffer that is being decrypted and moving this byte back to the register EAX. Then the data in the register EAX is transformed using one of the following operations: “not“, “dec“, “inc“, “sar“, “shl“, “or“, “add“, “sub“, “neg“, “xor“, “movzx“.
To find the beginning and the end of the decryption algorithm we can either use a Yara rule or a regular expression. When we have the required part of the code, we can use the malduck library to disassemble and analyze it. In every valuable instruction, the first operand is EAX or ECX, and this can be used as a filter. In addition, we note that the second operand can be a register, an immediate value, or a memory operand. If the memory operand is used, we can transform it to a named variable (it can be “b” – the value of the current byte, or “i” – the index of the current byte), using the following mapping: mem_vars_map = {0xFF: "b", 0xF8: "i"}.
mem_vars_map = {0xFF: "b", 0xF8: "i"}
for ins in filter(
    lambda _ins: _ins.op1.value in ("eax", "ecx") and _ins.mnem in supported_instructions,
    procmem(data).disasmv(0, size=len(data))
):
    if not ins.op2:
        op2 = None
    elif ins.op2.is_reg or ins.op2.is_imm:
        op2 = ins.op2.value
    elif ins.op2.is_mem:
        op2 = mem_vars_map.get(ins.op2.value & 0xFF)
    else:
        continue

    ops.append(get_operation(ins.mnem, ins.op1.value, op2))
The function “get_operation” used in the code sample above can be implemented in the following way:
var_list = {"eax": 0, "ecx": 0, "b": 0, "i": 0}

def get_operation(name, op1, op2):
    def not_op():
        var_list[op1] = (~var_list[op1]) & 0xFF

    def dec_op():
        var_list[op1] = (var_list[op2] - 1) & 0xFF

    def shl_op():
        var_list[op1] = (var_list[op1] << op2) & 0xFF

    def or_op():
        var_list[op1] |= var_list[op2] if isinstance(op2, str) else op2
        var_list[op1] &= 0xFF
    # ... implementation of other operations ...

    operations = {
        "not": not_op, "dec": dec_op, "shl": shl_op, "or": or_op,
        # ... other operations
    }
    return operations[name]
After we collect all the operations, we can decrypt the payload emulating the decryption algorithm:
def decrypter(enc_data):
    dec_data = []
    for _i, _b in enumerate(enc_data):
        var_list["eax"] = _b
        var_list["ecx"] = 0
        var_list["b"] = _b
        var_list["i"] = _i
        for _op in ops:
            _op()
        dec_data.append(var_list["eax"])
    return bytes(dec_data)
Please note that the highly simplified example we showed illustrates a possible approach to implement an automatic unpacker, but it is not comprehensive and may not work on some samples.
Other variants
In addition to this variant in this packer family, we discovered others, ranging from simple to more complex. Let’s take a look at some of them.
DLL with embedded shellcode
Unlike the previously discussed variant, in this case, the shellcode is also encrypted, but it is not stored in a separate file. Instead, it is embedded directly within the DLL and loaded into a stack-based array:
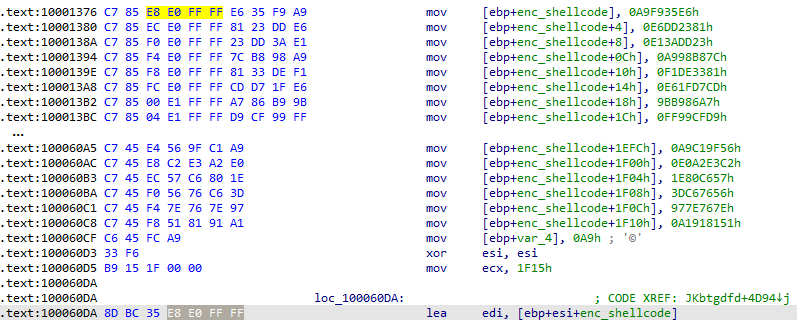
Figure 9 – Shellcode is stored in a stack-based array.
The boundaries of this part of the code containing the encrypted shellcode can be located using the following regular expression:
shellcode_block = re.search(
    b"\xC7\x85(..\xFF\xFF)(.{4})(\xC7(\x85..\xFF\xFF|\x45.)(.{4})){32,}.*\x8D..\\1",
    dll_data, re.DOTALL
)
The shellcode itself can also be extracted using a regular expression:
shellcode = b"".join(re.findall(b"\xC7(?:\x85..\xFF\xFF|\x45.)(.{4})", shellcode_block, re.DOTALL))
The XOR key for decrypting the shellcode is still stored in the DLL:

Figure 10 – Shellcode decryption key.
The NSIS package contains only two files: the DLL and the encrypted payload. The NSIS script has the corresponding changes:
Function .onGUIInit
    InitPluginsDir
    SetOutPath $INSTDIR
    SetOverwrite off
    File lbchv.zt
    jlpeylfn::JKbtgdfd
EXE instead of DLL
In some samples, the DLL plugin is replaced with a regular executable file. In this case, the NSIS package does not have a $PLUGINSDIR directory; all files are located in the root of the archive.

Figure 11 – The contents of the malicious installer package (EXE variant).
The NSIS script differs slightly: the executable file is invoked using the ExecWait command, and the path to the file storing the encrypted shellcode is passed as a command-line parameter:
Function .onGUIInit
    InitPluginsDir
    SetOutPath $INSTDIR
    SetOverwrite off
    File irgfodgeidi.lh
    File hgpngqlustf.ge
    File pnmess.exe
    ExecWait "$\"$INSTDIR\pnmess.exe$\" $INSTDIR\hgpngqlustf.ge"
The rest of the functionality remains unchanged, and the previously discussed approach can be applied for automatic unpacking.
Shellcode in resources
In this variant, the encrypted shellcode is stored in the resource of type RT_RCDATA:
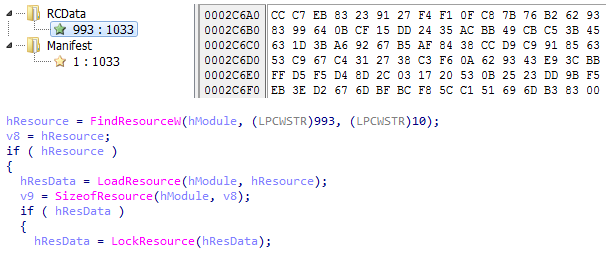
Figure 12 – Encrypted shellcode stored in resources.
The rest of the packer’s functionality remains unchanged.
RC4-encrypted payload
This variant has the most significant differences and is more challenging to unpack.
Let’s examine a sample where this packer variant is used. The package contains the following files:

Figure 13 – The contents of the malicious installer package (the variant with RC4-encrypted payload).
The System.dll plugin is not directly related to the packer and is an embedded NSIS plugin that provides the ability to call Windows API functions from the script.
When we analyzed the NSIS script itself, we indeed saw a sequence of API function calls. Through these calls, it allocates memory, sets the memory protection attribute PAGE_EXECUTE_READWRITE (0x40), reads the contents of the file “zeqtzxaeeuwcxjz” into it, and then transfers control there:
Function .onInit
    InitPluginsDir
    SetOutPath $INSTDIR
    File rdoc6dqwn7
    File zeqtzxaeeuwcxjz
    System::Alloc 56417
    Pop $8
    System::Call "kernel32::CreateFile(t'$INSTDIR\zeqtzxaeeuwcxjz', i 0x80000000, i 0, p 0, i 3, i 0, i 0)i.r10"
    System::Call "kernel32::VirtualProtect(i r8, i 56417, i 0x40, p0)"
    System::Call "kernel32::ReadFile(i r10, i r8, i 56417, t., i 0)"
    System::Call kernel32::GetCurrentProcess()i.r5
    System::Call "::$8(i r5, i r8, i0).i r5"
    Nop
    Exec $INSTDIR\yeller.dif
Let’s examine the code contained in the loaded file. This file contains the encrypted shellcode and implements its loading and decryption. First, the encrypted shellcode is placed byte-by-byte onto the stack:

Figure 14 – Shellcode is stored in a stack-based array.
After we identify the boundaries of the code where the encrypted shellcode is placed on the stack, we can easily extract it using a regular expression:
enc_shellcode = b"".join(re.findall(b"\xC6(?:\x85..\xFF\xFF|\x45.)(.)", key_code_block, re.DOTALL))
A simple custom stream cipher is used for decrypting the shellcode, and consists of a sequence of logical and arithmetic operations:
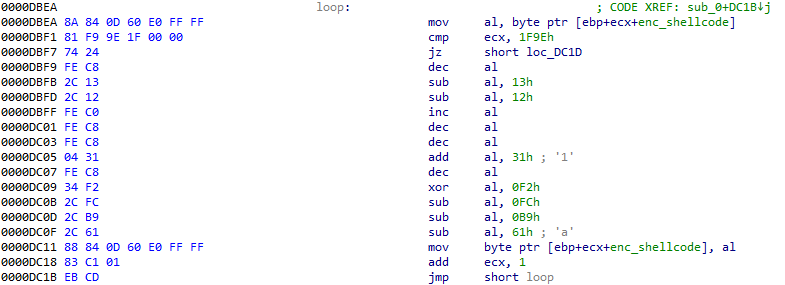
Figure 15 – Shellcode decryption.
To decrypt the shellcode, we can apply a similar approach to what we previously used for decrypting the payload, with slight modifications.
Additionally, in this variant, the shellcode itself differs significantly. Instead of a custom stream cipher, a modified RC4 cipher is used. The RC4 key is placed in a stack-string:

Figure 16 – The payload decryption key is stored in a stack-based array.
The RC4 cipher is modified in such a way that after applying RC4, we must then perform XOR with the RC4 key on the obtained data:
decrypted_data = rc4(rc4_key, enc_data)
decrypted_data = xor(rc4_key, decrypted_data)
Conclusion
This malicious packer family utilizing the Nullsoft Scriptable Install System is quite widespread and has been used for many years by cybercriminals for packing a large number of types of malicious payloads, such as loaders, stealers, and Remote Access Trojans (RATs). The extensive use and varied nature of the payloads it delivers indicate that it is likely a commodity sold on the dark web, accessible to various malicious actors rather than being the proprietary tool of a single entity. Consequently, the development of automated static unpacking tools is invaluable. These tools facilitate both manual and automated analysis by swiftly providing access to the unencrypted versions of the malware, which are essential for tasks like configuration retrieval, debugging, and disassembly.
Protections
Check Point Threat Emulation provides protection against this threat:
- Packer.Win.NSISCrypter.*
- Trojan.Win.Shellcode.F
- Trojan.Win.Shellcode.G
Related links
IOCs
| SHA256 | Variant | Payload |
| 12a06c74a79a595fce85c5cd05c043a6b1a830e50d84971dcfba52d100d76fc6 | DLL loader, Shellcode in a separate file | XLoader |
| 44e51d311fc72e8c8710e59c0e96b1523ce26cd637126b26f1280d3d35c10661 | EXE loader, Shellcode in a separate file | XLoader |
| 00042ff7bcfa012a19f451cb23ab9bd2952d0324c76e034e7c0da8f8fc5698f8 | Shellcode is embedded in the DLL | XLoader |
| 3f7771dd0f4546c6089d995726dc504186212e5245ff8bc974d884ed4f485c93 | EXE Loader, Shellcode in resources | Remcos |
| 160928216aafe9eb3f17336f597af0b00259a70e861c441a78708b9dd1ccba1b | Payload is RC4-encrypted | XLoader |
| cd7976d9b8330c46d6117c3b398c61a9f9abd48daee97468689bbb616691429e | EXE loader, Shellcode in a separate file | Agent Tesla |
| a3e129f03707f517546c56c51ad94dea4c2a0b7f2bcacf6ccc1d4453b89be9f5 | EXE loader, Shellcode in a separate file | 404 Keylogger |
| bb8e87b246b8477863d6ca14ab5a5ee1f955258f4cb5c83e9e198d08354bef13 | EXE loader, Shellcode in a separate file | Formbook |
| 178f977beaeb0470f4f4827a98ca4822f338d0caace283ed8d2ca259543df70e | EXE loader, Shellcode in a separate file | Lokibot |
| 80db5ced294160666619a79f0bdcd690ad925e7f882ce229afb9a70ead46dffa | DLL loader, Shellcode in a separate file | Warzone |
| 090979bcb0f2aeca528771bb4a88c336aec3ca8eee1cef0dfa27a40a0a06615c | EXE loader, Shellcode in a separate file | Azorult |


