50 CVEs in 50 Days: Fuzzing Adobe Reader
December 12, 2018

Research By: Yoav Alon, Netanel Ben-Simon
Introduction
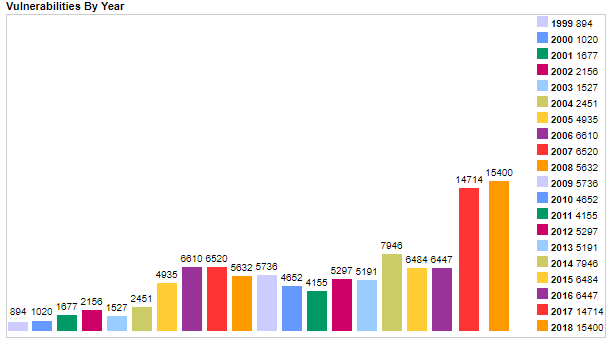
The year 2017 was an inflection point in the vulnerability landscape. The number of new vulnerabilities reported that year was around 14,000, which is over twice the number from the year before (see table below). The probable reason for this is the increased popularity of automatic vulnerability finding tools, also known as “fuzzers”.
The mere existence of fuzzers is not breaking news; they’ve been around for over two decades. The news is that fuzzers have grown up. They’ve become more capable, more accessible, and overall more mature. Still, using fuzzers has somewhat of a reputation as a “dark art”, a lot of researchers don’t bother with fuzzers because they are perceived as a hassle to use.
Given all the above, we found it natural to ask: Yes, more researchers are using fuzzers to find more vulnerabilities — but are *all* the researchers using fuzzers to find *all* the vulnerabilities? How many low-hanging fruits are still out there, just waiting for the first person to press the big shiny button that says ‘FUZZ’?
To find out, we constructed the most vanilla experiment we could think of. We took one of the most common Windows fuzzing frameworks, WinAFL, and aimed it at Adobe Reader, which is one of the most popular software products in the world. We set a time-frame of 50 days for the entire endeavor – reverse-engineering the code, looking for potential vulnerable libraries, writing harnesses and, finally, running the fuzzer itself.
The results left us flabbergasted. In those 50 days, we were able to find over 50 new vulnerabilities in Adobe Reader. On average, that’s 1 vulnerability per day — not quite the usual pace for this kind of research.
In this paper, we lay out the entire story of this research. We share a novel methodology we used to increase the scope of our search, improvements that we were able to make to WinAFL, and, finally, the insights we gained along the way.
What is WinAFL?
AFL is a coverage guided genetic fuzzer, which has a rock solid implementation and clever heuristics that have proven to be very (!) successful in finding real bugs in real software.
WinAFL is a fork of AFL for Windows, created and maintained by Ivan Fratric (Google Project Zero). The Windows version uses a different style of instrumentation which enables us to target closed source binaries.
We recommend reading the AFL technical paper, which goes into detail on how AFL works. It also points out the tool’s shortcomings and helps you debug when things go wrong.
We found WinAFL to be extremely effective in finding file format bugs, especially in compressed binary formats (images / videos / archives).
Attacking Acrobat Reader DC
The easiest place to start is the main executable, AcroRd32.exe. This is a (relatively) thin wrapper around AcroRd32.dll, which is approximately 30MB in size. AcroRd32.dll has a lot of code, some of which contains parsers for PDF objects, but a lot of it is GUI code (not the place you usually want to look for bugs).
We know that WinAFL is better at binary formats, so we decided to focus our efforts and attack a specific parser. The challenge is to locate a parser and write a harness for it. We’ll explain what exactly is a harness is a bit later on.
We want a binary format parser with minimal dependencies that we can load without also loading the entire Reader process.
We explored the DLLs in Acrobat’s folder and found that JP2KLib.dll fits all categories:
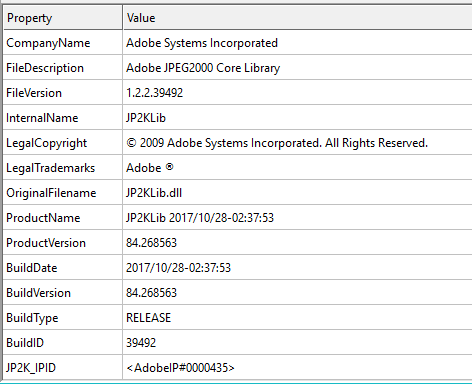
JP2KLib.dll is a parser for the JPEG2000 format, which is a complex binary format (753 KB), and has exported functions which are pretty descriptive.
The research was conducted on the following versions:
Acrobat Reader DC 2018.011.20038 and earlier
JP2KLib.dll version 1.2.2.39492
What Is a Target Function?
A target function is a term that WinAFL uses to describe the function that is used as the entry point to the fuzzing process. The function is called in a loop for fuzz_iterations times, each time mutating the input file on disk. The function must:
Finding such a function in nature is pretty uncommon. When targeting a complex software, we usually need to write a harness.
What Is a Harness?
A harness is a small program that triggers the functionality we want to fuzz. The harness includes a function which will be used as our target function. Here’s an example for a minimal harness for gdiplus from the WinAFL repository:
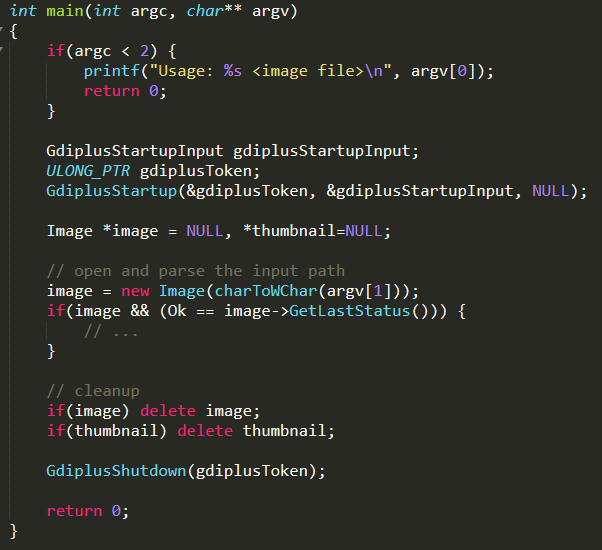
The first argument to main is a path. Within the function, we call the Image::Image parser, which is the API we wanted to fuzz. Notice that in error cases, we don’t terminate the process and at the end we free all resources.
This process is relatively easy for documented API. We can copy a sample code or write a simple program using the documentation. But where’s the fun in that?
We chose to target Adobe Reader, which is a closed sourced binary. The process of writing a harness for this type of target looks something like this:
In the following section, we describe in detail how we reverse-engineered JP2KLib, and wrote a working harness for it. We also share a few tips. Readers who are only interested in our fuzzing methodology can skip to the next section.
Writing a Harness for JP2KLib.dll
Before starting to reverse-engineer JP2KLib.dll, we checked whether the library is open source or has public symbols. This is a big time saver and is more common than you might think. But in our case, we weren’t so lucky.
As we wanted our harness to be as similar as possible to how Adobe Reader uses JP2KLib, the first thing we had to do is to find a PDF file that triggers the behavior we wanted to fuzz. This enables us to easily locate the relevant parts of the program.
In our case, we have a large corpus of PDFs for testing our products. We grepped the string “/JPXDecode“, which is the PDF filter for JPEG2000, and used the smallest example that came up. We could also have googled for a sample file or used Acrobat Pro / Phantom PDF to generate a test case.
Pro Tip 1: The reader has a sandbox, which is sometimes annoying for debugging/triaging, but this can be disabled – https://forums.adobe.com/thread/2110951
Pro Tip 2: We turned on PageHeap to assist in the reverse-engineering efforts, as it helps in tracking allocation place and size.
We extracted the jp2 file from our sample, so we could use it for our harness without the PDF wrapper. This will be used as our testing input for the harness.
Now that we had a minimal working example, we placed a breakpoint on the load event of JP2KLib.dll using “sxe ld jp2klib”. When the breakpoint hit, we placed a breakpoint command on all exported functions of JP2KLib. The breakpoint command logs the call stack, the first few arguments, and the return value:
bm /a jp2klib!* “.echo callstack; k L5; .echo parameters:; dc esp L8; .echo return value: ; pt; ”
We loaded the sample PDF and got the following output:
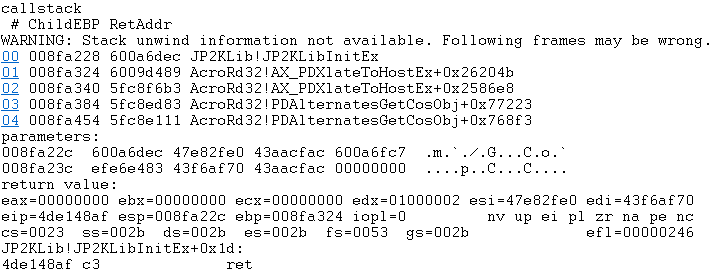
JP2KLibInitEx is the first function called after loading JP2KLib. We noticed that JP2KLibInitEx takes only one argument. Let’s examine it:
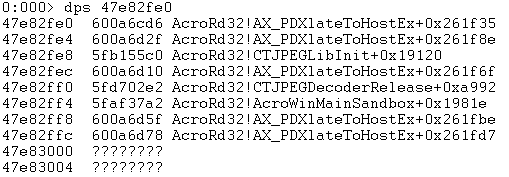
We can see that it’s a struct of size 0x20 and it contains pointers to functions in AcroRd32.dll. When we encounter an unknown function, we don’t rush into reversing it as we don’t know if it’s going to be used by the target code. Instead, we point each address to a unique empty function we call “nopX” (where X is a number).
We now have enough information to start writing our harness skeleton:
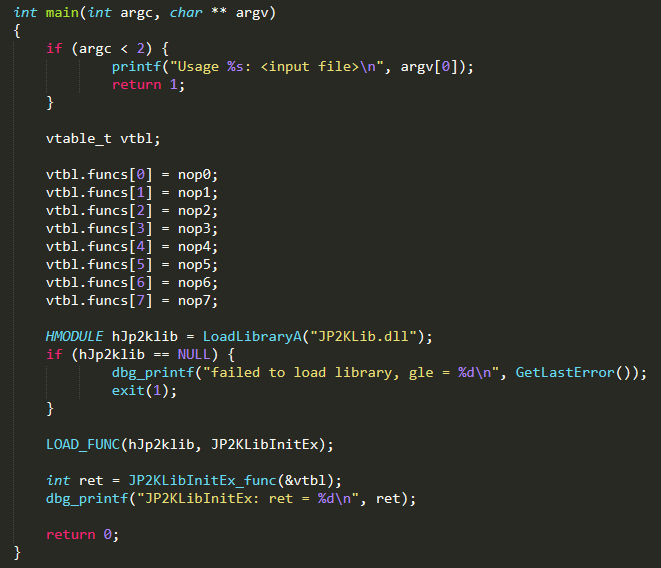
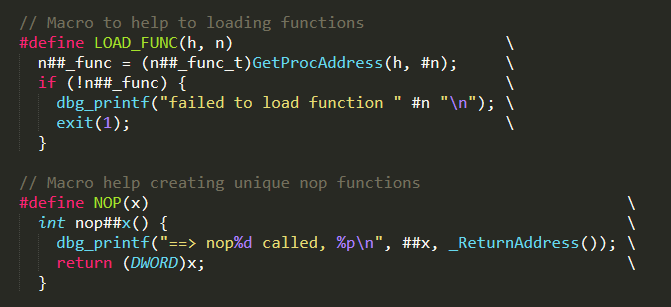
We use LOAD_FUNC as a convenience macro. We also have a NOP(x) macro for creating nop functions.
We compile, run it with sample.jp2 – and it works!
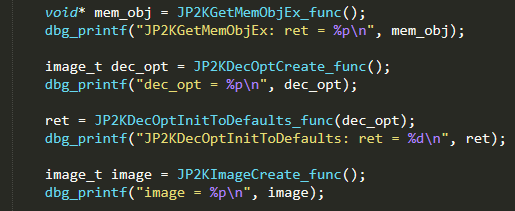
Let’s continue (“g”). We then move to the next function JP2KGetMemObjEx which doesn’t take any arguments, so we call it and save the return value.
The next function JP2KDecOptCreate also doesn’t take any arguments, so we call it and save the return value. However, we notice that JP2KDecOptCreate internally calls nop4 and nop7, which means we need to implement them.
Our next move is to understand what “nop4” does. We placed a breakpoint on the original function pointer to “nop4” AcroRd32!CTJPEGDecoderRelease+0xa992 and continued execution:
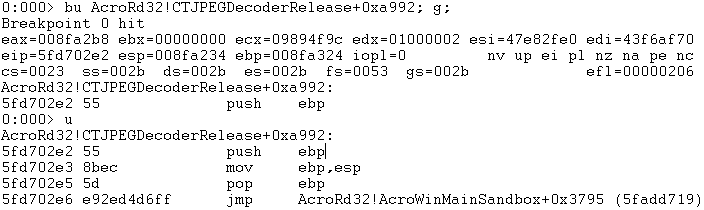
Which took us to:

And after few steps:

So it turns out that nop4 is a thin wrapper around malloc. We implemented it in our harness and replaced it with “nop4”. We repeated this procedure again for nop7 and found out it was memset!. We looked around and saw that nop5 and nop6 and were free and memcpy respectively.
The next function, JP2KDecOptInitToDefaults, was called with one argument. This was the return value from JP2KDecOptCreate, so we passed the value to it.
The next function, JP2KImageCreate, takes no arguments, so we called it and saved the return value.
Currently, our harness looks something like this:
The next function is JP2KImageInitDecoderEx, which takes 5! arguments.
We matched 3 out of 5 parameters to return values from: JP2KImageCreate, JP2KDecOptCreate and JP2KGetMemObjEx
We noticed that the 3rd parameter points to a vtable. We did the same trick as before – created a struct with the same size that points to “nop” functions.
The 2nd parameter points to another struct, only this time it doesn’t seem to contain function pointers. We decided to send the const value 0xbaaddaab.
At this point the code looks like this:

We ran our harness and quickly arrived at nop10. We set a breakpoint in Adobe Reader on the corresponding function and got to the following call stack:
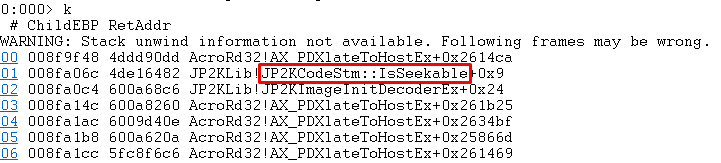
Looking at JP2KCodeStm::IsSeekable in IDA:
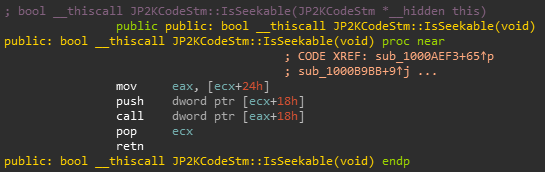
Looking at WinDbg, we can see that JP2KCodeStm at offset 0x24 contains our vtable and offset 0x18 contains 0xbaaddaab. We can see that JP2KCodeStm::IsSeekable calls a function from our vtable passing 0xbaaddaab as the first parameter, so it’s basically a thin wrapper around our vtable function #7.
In general, every parser is a bit different but usually they consume an input stream which could be in a familiar file interface (like FILE / ifstream). More often than not, it’s some sort of a custom type that abstracts the underlying input stream (network / file / memory). So when we saw how JP2KCodeStm was used, we knew what we were looking at.
Back to our case, 0xbaaddaab is the stream object and the vtable functions operate on the stream object.
We moved to IDA and looked at all the other JP2KCodeStm::XXX functions.
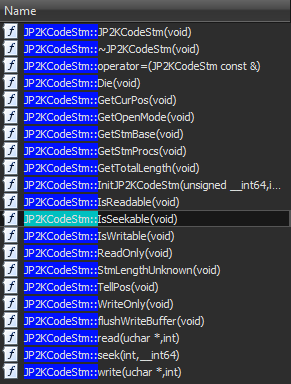
They were all very similar, so we went ahead and created our own file object, and implemented all the necessary methods. The resulting code looks like:
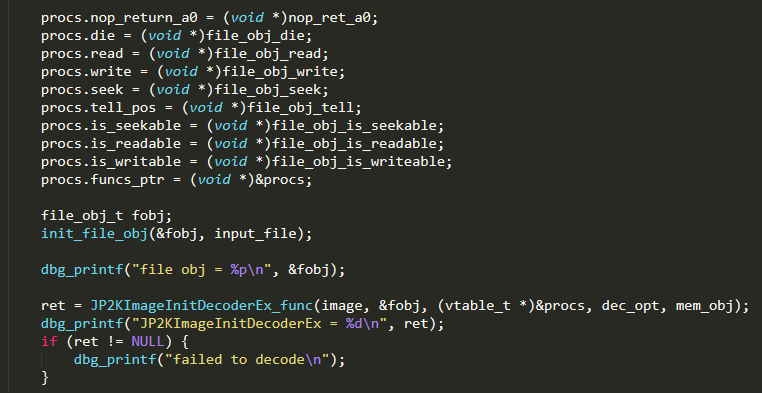
We made sure we checked the return value from JP2KImageInitDecoderEx and bailed in case of error. In our case, JP2KImageInitDecoderEx returns 0 on success. It took us a few tries to implement the stream functions correctly, but we finally got our desired return value.
The next function, JP2KImageDataCreate, takes no arguments and its return value is passed to the following function JP2KImageGetMaxRes. We called them both and moved on.
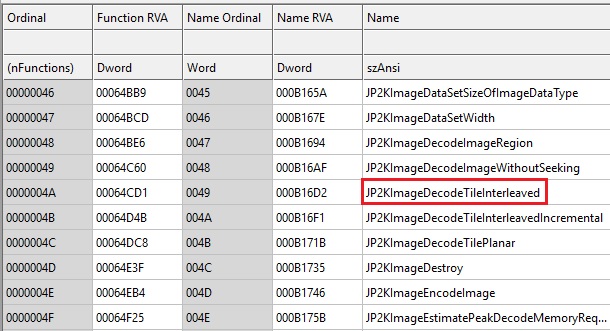
We got to the JP2KImageDecodeTileInterleaved function which takes 7! Arguments, of which 3 are return values from JP2KImageCreate, JP2KImageGetMaxRes, and JP2KImageDataCreate.
The 2nd and 6th parameters were found to be null after xrefing and looking inside AcroRd32 in IDA.
We remained with the 4th and 5th arguments. We concluded that they depend on the color depth (8/16), so we decided to fuzz with constant depth.
Finally we got:

At last, we called the functions JP2KImageDataDestroy, JP2KImageDestroy, and JP2KDecOptDestroy to release the objects we created and avoid memory leaks. This is critical for WinAFL when fuzz_iterations are high.
Done! We have a working harness!
In one final tweak, we separated the initialization code – loading JP2KLib and finding the functions from the parsing code. This improves performance, as we don’t have to pay for initialization in every fuzz iteration. We called the new function “fuzzme”. We will also export “fuzzme” (you can export functions in an exe file) as it’s easier than finding the relevant offset in the binary.
Anecdote: When testing our harness in WinAFL, we found out that WinAFL generates files with duplicate magic. After we dug a bit, we found that Adobe used different SEEK constants than the ones defined in libc, causing us to mix SEEK_SET and SEEK_CUR.
Fuzzing Methodology
Basic Tests for the Harness
Before starting a big fuzzing session, we do a few sanity tests to make sure we’re not just heating servers. The first thing we check is that the fuzzer is reaching new paths with our harness, meaning that the total path count is steadily rising.
If the path count is zero or almost zero, there are a few pitfalls we can check for:
We let the fuzzer run for a few minutes and then checked the stability of the fuzzer. If the stability is low (under 80%), we try to debug the issue. The stability of the harness is important, as it affects the accuracy and performance of the fuzzer.
Common pitfalls:
If all the above fail, we use DynamoRIO to do instruction tracing for the harness and diff the output.
Fuzzing Setup
Our setup consists of a VM with 8-16 cores and 32 GB of RAM, running Windows 10 x64.
We fuzz on a RAM disk drive using ImDisk toolkit. We discovered that with fast targets, writing test cases to disk is a performance bottleneck.
We disable Windows Defender because it hurts performance and because some of the test cases generated by WinAFL were discovered by Windows Defender as a known exploit (“Exploit:Win32/CVE-2010-2889”).

We disable the Windows Indexing Service for performance.
We disable Windows Update because it interferes with the fuzzing efforts (restarts the machine and replaces fuzzed DLLs).
We enable page heap for the harness process because it has proven to find bugs that we wouldn’t detect otherwise.
We use the edge as the coverage type instead of the default basic block as it proved better in finding bugs, despite the fact that it’s slower than basic block mode.
This is an example command for running our adobe_jp2k harness:
afl-fuzz.exe -i R:\jp2k\in -o R:\jp2k\out -t 20000+ -D c:\DynamoRIO-Windows-7.0.0-RC1\bin32 -S Slav02 — -fuzz_iterations 10000 -coverage_module JP2KLib.dll -target_module adobe_jp2k.exe -target_method fuzzme -nargs 1 -covtype edge — adobe_jp2k.exe @@
Initial Corpus
Once we have a working harness, we create an initial corpus for it, usually from:
Corpus Minimization
Using a big corpus of files that produce the same coverage hurts the performance of the fuzzer. AFL handles this by minimizing the corpus using afl-cmin. WinAFL has a port for the tool called winafl-cmin.py.
We take all the files that we gathered and run them through winafl-cmin.py, which results in a minimal corpus.
We run winafl-cmin at least two times to see if we get the same set of files. If we got two different sets, it usually means that there’s non-determinism in our harness. This is something we try to investigate, using afl-showmap or other tools.
Once we finished minimizing successfully, we save the set of files as our initial corpus.
Initial Line Coverage
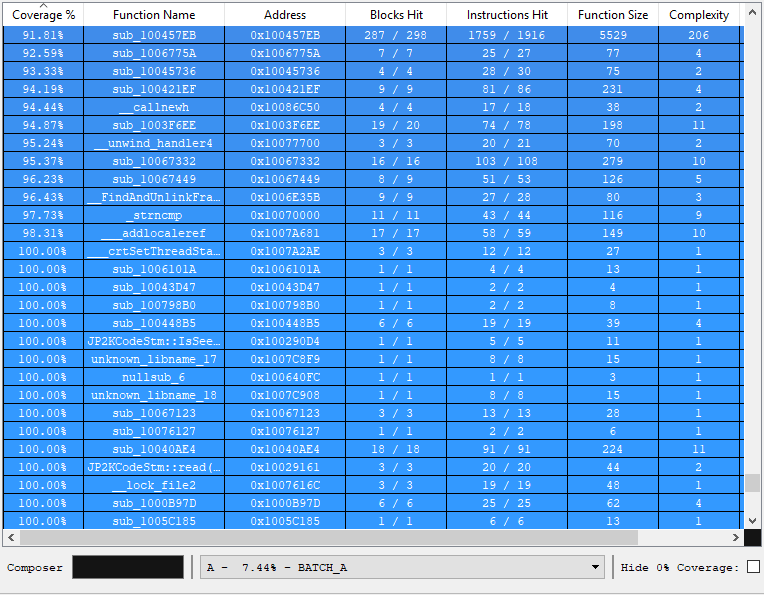
Now that we have a minimal corpus, we want to take a look at our line coverage. Line coverage means which assembly instructions we actually executed. To get line coverage, we use DynamoRIO: “[dynamoriodir]\bin32\drrun.exe -t drcov — harness.exe testcase” for each test case. Next, we load the results to IDA using Lighthouse:
We note the initial line coverage, as it helps us to evaluate how effective the fuzzing session was.
Fuzzing Cycle
The next step is pretty straight forward:
Running the fuzzers, does not require anything special. Just run the fuzzers in the configuration we listed above.
We have a bot with the following features:
We can’t stress enough how important it is to automate those tasks. Otherwise, fuzzing is tedious and error-prone.
We check the status of the fuzzers every couple of hours and the paths over time. If we see that the graph plateaus, we try to investigate the coverage.

We copy all the queues of all the fuzzers and run them through cmin and look at the results in IDA. We look for functions that are relatively large and have very small coverage. We try to understand what functionality is related to this function and proactively find samples that will trigger this functionality. In JP2K, this wasn’t very helpful but in other targets, especially text formats, this phase is a big win!
This stage is very important; in one case, we added a single sample and after a few hours of fuzzing it contributed 1.5% line coverage and we discovered 3 new security bugs.
We then repeated the cycle until we ran out of time or we didn’t see any coverage improvement. This usually means we must either change the target or try to improve the harness.
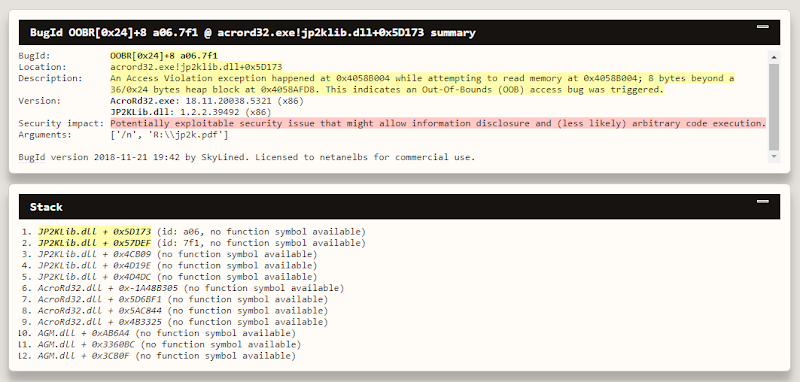
Triage
Once we have a set of test cases that causes a crash, we manually examined the crashes and each crashing input. We quickly changed strategy, as we had a lot of duplicates. We started using BugId to automatically find duplicates and minimize the set to only unique crashes. We used our bot for that.
What We Found
This strategy eventually allowed us to find 53 critical bugs in Adobe Reader and Adobe Pro.
We repeated this process for different parsers such as images, stream decoders and xslt module, which resulted in the following list of CVEs:
CVE-2018-4985, CVE-2018-5063, CVE-2018-5064, CVE-2018-5065, CVE-2018-5068, CVE-2018-5069, CVE-2018-5070, CVE-2018-12754, CVE-2018-12755, CVE-2018-12764, CVE-2018-12765, CVE-2018-12766, CVE-2018-12767, CVE-2018-12768, CVE-2018-12848, CVE-2018-12849, CVE-2018-12850, CVE-2018-12840, CVE-2018-15956, CVE-2018-15955, CVE-2018-15954,CVE-2018-15953, CVE-2018-15952, CVE-2018-15938, CVE-2018-15937, CVE-2018-15936, CVE-2018-15935, CVE-2018-15934, CVE-2018-15933, CVE-2018-15932 , CVE-2018-15931, CVE-2018-15930 , CVE-2018-15929, CVE-2018-15928, CVE-2018-15927, CVE-2018-12875, CVE-2018-12874 , CVE-2018-12873, CVE-2018-12872,CVE-2018-12871, CVE-2018-12870, CVE-2018-12869, CVE-2018-12867 , CVE-2018-12866, CVE-2018-12865 , CVE-2018-12864 , CVE-2018-12863, CVE-2018-12862, CVE-2018-12861, CVE-2018-12860, CVE-2018-12859, CVE-2018-12857, CVE-2018-12839, CVE-2018-8464
One of the bugs we found in jp2k was actually reported to Adobe just a short while before we found it, as it seems it was already discovered being exploited in the wild.
Of course, Adobe Reader is sandboxed, and Reader Protected Mode greatly increases the complexity of turning an exploitable crash inside the sandbox into system compromise, which usually requires another PE exploit, as was used in the mentioned in-the-wild exploit.
We love WinAFL and hope to see it used more.
While using WinAFL, we encountered a number of bugs / missing features. We added support for those new features and upstreamed the patches. These include adding support for App verifier in Windows 10, CPU affinity for workers, fixed a few bugs and added some GUI features.
You can view the commits here:
Netanel’s commits – https://github.com/googleprojectzero/winafl/commits?author=netanel01
Yoava’s commits – https://github.com/googleprojectzero/winafl/commits?author=yoava333